
Nothing says comfort dessert quite like Amish Peanut Butter Cream Pie. With a buttery crust, a sweet-salty layer of peanut butter “crumbs,” silky vanilla custard, and a billowy crown of whipped cream, it’s the kind of old-fashioned pie that travels from church suppers to family reunions and disappears slice by slice. This full guide covers the heritage behind the pie, the exact ingredients you’ll need, pro techniques for foolproof custard, a classic baked version, a no-bake shortcut, and make-ahead tips—so you can serve a perfect slice every single time.
Table of Contents
What makes Amish Peanut Butter Cream Pie special
At its heart, Amish Peanut Butter Cream Pie blends two beloved dessert traditions: the cream pie (with its velvety custard base) and the uniquely Amish twist of powdered-sugar peanut butter crumbs. The result is a layered experience—crumbly and nutty at the base of the filling, satiny in the middle, and cloud-light on top—that keeps each bite interesting.
Key hallmarks of the authentic style:
- The peanut butter crumb layer: A blend of peanut butter and powdered sugar rubbed together until it resembles soft, sweet gravel. It’s scattered over the crust before the custard goes in, adding texture and a gentle, peanutty sweetness in every forkful.
- A cooked custard: Traditional versions use a stovetop custard made with milk, eggs, cornstarch, and sugar, flavored with vanilla. It sets up cleanly when chilled and slices neatly.
- Whipped topping or meringue: Many Amish bakeries finish cream pies with whipped cream, but you’ll also see meringue in some regions. Whipped cream is easier and more stable for home bakers.
- Modest sweetness: Amish desserts tend to aim for balance. Even with peanut butter and cream, the pie tastes indulgent without being cloying.
Why this pie stays popular:
- It’s make-ahead friendly. The pie needs time to chill, which makes it perfect for holidays or potlucks.
- It travels well. Fully set and chilled, it slices cleanly and transports easily in a pie carrier.
- It scales and adapts. Double the recipe for two pies, use a graham cracker crust to save time, or make a no-bake filling if you’re short on time.
In short, Amish Peanut Butter Cream Pie checks all the boxes: simple pantry ingredients, nostalgic flavor, and a dependable, crowd-pleasing result every time.
Pantry and tools: ingredients and equipment
Here’s everything you need for a classic baked-custard version, plus sensible substitutions if your pantry isn’t fully stocked.
Core ingredients for a 9-inch pie (8 servings):
- Pie crust: 1 single 9-inch crust, homemade or store-bought. Choose traditional flaky pastry or a graham cracker crust if you prefer no blind-bake fuss.
- Peanut butter crumbs:
- Creamy peanut butter (regular, not “natural” with oil separation)
- Powdered sugar
- Custard filling:
- Whole milk (for body and flavor)
- Heavy cream (optional, for extra richness; replace a portion of the milk)
- Granulated sugar
- Cornstarch (for thickening)
- Egg yolks (for custard structure and silkiness)
- Butter (for gloss and mouthfeel)
- Pure vanilla extract
- Fine salt (to sharpen flavor)
- Topping:
- Heavy cream
- Powdered sugar
- Vanilla extract
- Optional cream cheese or instant clear gelatin to stabilize whipped cream for longer holds
Substitutions that still taste authentic:
- Milk: 2% milk works, but simmer a minute longer for full set. For dairy sensitivity, use a high-fat plant milk (like canned coconut milk) and note the flavor shift.
- Peanut butter: Smooth, conventional peanut butter blends best. If using natural peanut butter, stir extremely well and add a bit more powdered sugar to form dry crumbs.
- Thickener: You can swap half the cornstarch for flour; cornstarch gives a clearer, silkier set.
- Topping: Use stabilized whipped cream if the pie needs to hold for more than a day, or choose meringue and torch it lightly for a bakery finish.
Useful equipment:
- 9-inch pie dish (glass or metal)
- Medium heavy-bottomed saucepan
- Heat-proof mixing bowls
- Whisk (balloon whisk for aeration is ideal)
- Rubber spatula
- Hand mixer or stand mixer with whisk
- Fine-mesh strainer (for the custard, optional but recommended)
- Instant-read thermometer (optional; helps diagnose custard doneness)
- Pie weights, beans, or sugar for blind baking (if using pastry crust)
Ingredient sourcing tips:
- Choose peanut butter with minimal added oil to avoid greasy crumbs.
- Use fresh cornstarch; old cornstarch can lose thickening power.
- Real vanilla extract brings warmth that balances peanut flavor; reserve vanilla bean paste for an extra-special presentation.
Pie crust and peanut butter crumbs
The crust provides a buttery base and the peanut butter crumb layer gives Amish Peanut Butter Cream Pie its signature texture. You can go two ways on the crust—both are excellent:
Option A: Flaky pastry crust (par-baked)
- Use your favorite single-crust pastry recipe or a quality refrigerated crust.
- Roll and fit into a 9-inch pie plate. Crimp edges.
- Chill the lined pan 20–30 minutes to reduce shrinkage.
- Dock the base with a fork. Line with parchment and fill with pie weights or sugar.
- Bake at 375°F (190°C) for 15–18 minutes until edges start to set. Remove weights.
- Bake 5–8 minutes more until the bottom looks dry and just turning pale golden.
- Cool completely before filling.
Pros: Sturdy, classic texture; holds up well to custard. Cons: Extra step to blind bake.
Option B: Graham cracker crust (no blind-bake custard option)
- Combine finely crushed graham crackers (about 1 1/2 cups), granulated sugar (2 to 3 tablespoons), and a pinch of salt.
- Stir in melted butter (about 6 tablespoons) until it holds when pressed.
- Press firmly into the pie plate, including up the sides.
- Bake 8–10 minutes at 350°F (175°C), then cool. For a completely no-bake pie, you can skip the bake but expect a softer set and slightly more crumbly slices.
Pros: Faster, slightly sweeter; pairs beautifully with peanut butter. Cons: Slightly less structure compared to pastry.
Peanut butter crumb layer:
- In a medium bowl, combine 1/2 cup creamy peanut butter with 1/2 to 3/4 cup powdered sugar.
- Use a fork or fingers to blend until pebbly crumbs form that are dry to the touch, not paste-like. If too sticky, add powdered sugar a tablespoon at a time. If too dry, work in 1 teaspoon peanut butter.
- Scatter about two-thirds of the crumbs over the cooled crust; reserve the rest for garnish.
Tips for great crumbs:
- Temperature matters: Room-temperature peanut butter blends more easily with sugar and produces a consistent crumb.
- Texture test: Pinch a bit between your fingers. It should hold briefly, then break—like soft, sugary gravel.
- Salty-sweet balance: If your peanut butter is unsalted, add a small pinch of fine salt to lift flavors.
Flavor twists at the crust layer:
- Chocolate lovers: Brush the cooled pastry crust with 2–3 ounces of melted semisweet chocolate and let it set before adding crumbs to create a thin, crisp barrier.
- Pretzel crumb crust: Replace some graham crackers with ground pretzels for a sweet-salty edge.
- Nutter Butter crust: Process peanut butter sandwich cookies into crumbs and use in place of graham crackers for an all-in peanut butter experience.
By building a sturdy base and a distinctive crumb layer, you set the stage for a custard that won’t sog out the crust and a final slice that tastes complex, not one-note.
Cooked custard filling from scratch
A silky custard is the soul of Amish Peanut Butter Cream Pie. It should slice cleanly, hold its shape, and melt on the tongue. Here’s a reliable stovetop method with tempering for a lump-free finish.
Ingredients (custard):
- 2 cups whole milk
- 1/2 cup heavy cream (optional; replace with milk if preferred)
- 2/3 cup granulated sugar
- 1/4 cup cornstarch
- 1/4 teaspoon fine salt
- 4 large egg yolks
- 2 tablespoons unsalted butter, room temp
- 1 1/2 teaspoons pure vanilla extract
Method:
- Whisk the dry base: In a medium saucepan off heat, whisk sugar, cornstarch, and salt to break up any cornstarch clumps. This prevents lumps later.
- Add dairy: Slowly whisk in milk and heavy cream until smooth. Place over medium heat, whisking frequently, scraping corners of the pan.
- Heat to steam: When the mixture is steaming and slightly thickened, about 6–8 minutes, remove from heat.
- Temper the yolks: In a separate bowl, whisk yolks. Stream in a ladle of the hot mixture while whisking constantly. Repeat with another ladle. This steps the yolks up in temperature so they won’t scramble.
- Return and thicken: Pour the tempered yolk mixture back into the saucepan. Return to medium heat and whisk constantly until thick bubbles “blorp” up from the center and the custard coats the back of a spoon—about 2–4 minutes. If you have a thermometer, aim for 180–185°F (82–85°C).
- Finish: Remove from heat. Whisk in butter and vanilla until glossy. Press custard through a fine-mesh strainer into a clean bowl for the smoothest texture.
- Cool slightly: Let the custard sit 5 minutes, whisking once or twice to release steam. You want it hot enough to meld with crumbs, but not boiling.
Assembly with custard:
- Sprinkle the prepared crust with two-thirds of the peanut butter crumbs.
- Pour warm custard over the crumbs, spreading evenly.
- Tap the pie gently to smooth the surface and pop larger bubbles.
Setting:
- Press plastic wrap directly on the surface to prevent a skin.
- Chill in the refrigerator at least 4 hours, preferably overnight, to fully set.
Troubleshooting and pro tips:
- Lumps: Strain the custard. A few whisk strokes with a hand mixer on low can also smooth it.
- Too loose: The custard may need a few more minutes on heat next time, or your cornstarch was old. Chill longer to see if it firms; it often tightens up by hour 6–8.
- Eggy taste: Usually from overheating the yolks or holding at a simmer too long. Temper carefully and pull from heat as soon as it thickens.
- Weeping: Condensation on top is normal; blot before topping. If you see a watery layer inside the pie, the cornstarch undercooked or the pie warmed too much before chilling.
This custard method delivers a lush, sliceable center that’s rich but not heavy, exactly what you want beneath the whipped topping.
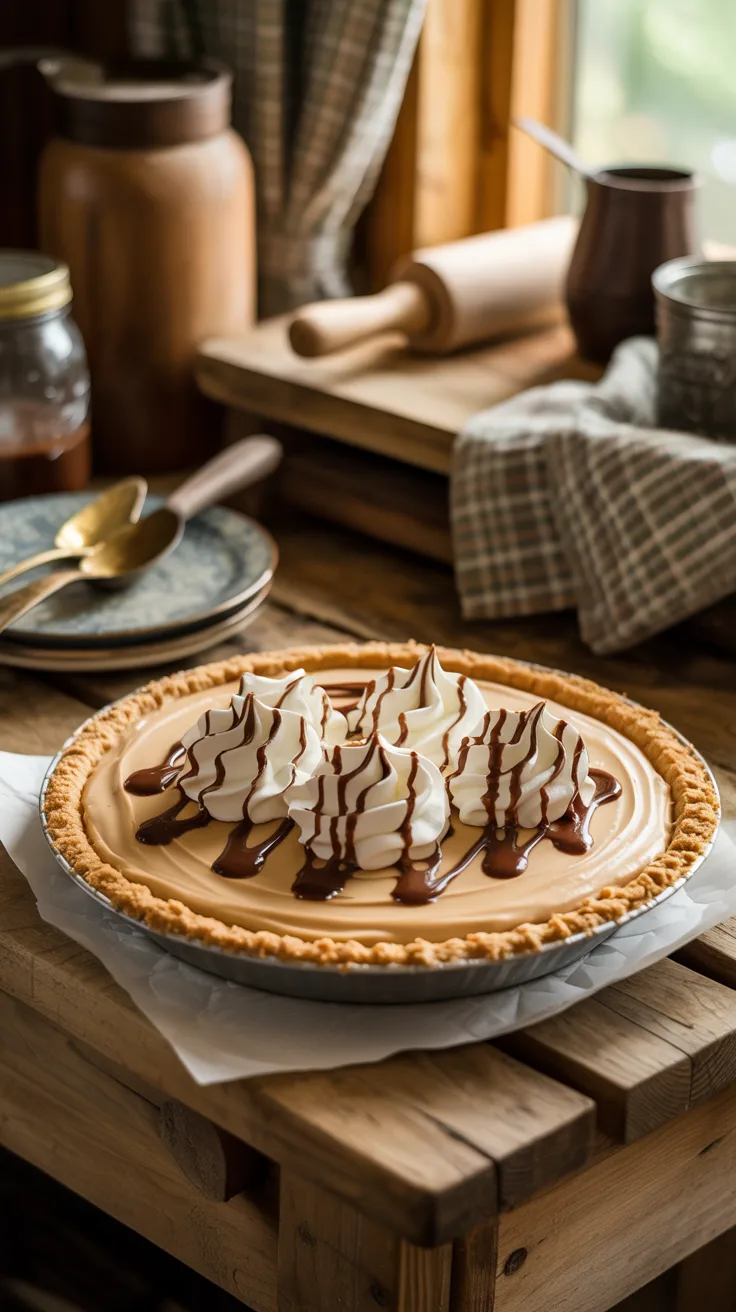
Toppings, garnishes, and final assembly
Whipped cream is the finishing flourish for Amish Peanut Butter Cream Pie, adding lightness to contrast the custard’s silk and the crumb’s sweetness.
Classic whipped topping:
- 1 cup cold heavy cream
- 2–3 tablespoons powdered sugar
- 1 teaspoon vanilla extract
- Pinch of fine salt
Method:
- Beat cold cream on medium speed to soft peaks.
- Add powdered sugar, vanilla, and salt.
- Beat to medium peaks: firm enough to hold swoops but still silky.
Stabilized whipped cream (for longer holds and cleaner cuts the next day):
- Add 1 ounce softened cream cheese while whipping, or
- Bloom 1 teaspoon unflavored gelatin in 1 tablespoon water, melt briefly, cool slightly, and stream into softly whipped cream before finishing.
Garnishes:
- Reserved peanut butter crumbs: Sprinkle over the whipped cream.
- Chocolate shavings or mini chips: Peanut butter and chocolate are natural companions.
- Drizzle: Warm 2 tablespoons peanut butter with 1–2 teaspoons cream or milk to a drizzleable consistency; zigzag over the top.
- Roasted peanuts: Chop finely for crunch.
- Cocoa dusting: A light sprinkle adds contrast without extra sweetness.
Final assembly:
- Once the custard is fully chilled and set, remove plastic wrap and blot any condensation.
- Spread or pipe the whipped topping evenly over the pie.
- Finish with remaining peanut butter crumbs and any optional garnishes.
- Chill 30 minutes before slicing to let the topping firm.
Slicing neat wedges:
- Use a thin, sharp knife warmed under hot water and dried between cuts.
- Wipe the knife clean after each slice for picture-perfect edges.
- Lift slices with a pie server, supporting the crust to keep the wedge intact.
Serving notes:
- Serve chilled, not icy. If the pie is very cold, let it sit at room temperature 10–15 minutes to soften the custard’s texture.
- Pairings: Coffee, cold milk, or black tea. The roasty notes accent the peanut butter and vanilla.
Presentation upgrades:
- Pipe the whipped cream in rosettes and fill gaps with crumbs.
- Create alternating bands of chocolate shavings and crumbs for a bakery window look.
No-bake Amish Peanut Butter Cream Pie (shortcut)
When the kitchen is hot or time is short, a no-bake variation brings the same nostalgic flavor profile with less effort. The key is achieving a firm, sliceable filling without the stovetop custard.
Crust:
- Use a graham cracker crust pressed firmly. For best structure, bake 8–10 minutes at 350°F (175°C) and cool completely; for truly no-bake, chill the pressed crust 30 minutes to set the butter.
Peanut butter crumb layer:
- Prepare the same as the classic version and scatter two-thirds onto the cooled crust.
No-bake filling options:
Option 1: Pudding-cream cheese filling
- 1 package instant vanilla pudding (3.4 ounces)
- 1 3/4 cups cold milk (reduce by 1/4 cup from box directions for a firmer set)
- 4 ounces cream cheese, softened
- 1/2 cup powdered sugar
- 1 teaspoon vanilla
- Pinch of salt
Method:
- Whisk pudding with milk for 2 minutes until thick.
- In a separate bowl, beat cream cheese, powdered sugar, vanilla, and salt until smooth.
- Fold the pudding into the cream cheese mixture until fully blended.
- Spread over the crumb layer.
Option 2: Whipped peanut butter mousse filling (for an all-in peanut note)
- 8 ounces cream cheese, softened
- 1/2 cup creamy peanut butter
- 2/3 cup powdered sugar
- 1 teaspoon vanilla
- Pinch of salt
- 1 1/4 cups cold heavy cream, whipped to medium peaks
Method:
- Beat cream cheese, peanut butter, powdered sugar, vanilla, and salt until smooth.
- Fold in whipped cream in two additions until silky.
- Spread over crumbs. This version has a richer peanut butter character and pairs well with a chocolate drizzle.
Topping:
- Finish with lightly sweetened whipped cream as in the classic version.
- Garnish with remaining crumbs and optional chocolate shavings.
Chill:
- Refrigerate at least 4 hours (preferably overnight) to set firmly before slicing.
Pros of no-bake:
- Fast assembly, minimal equipment, and no tempering eggs.
- Summer-friendly when you want to avoid the stove.
Cons:
- Slightly softer set compared to cooked custard.
- Flavor profile leans more toward pudding or cheesecake depending on the option you choose.
Whichever route you pick, you’ll still deliver an unmistakable Amish Peanut Butter Cream Pie vibe: crumbly peanut sweetness, creamy middle, and cool whipped finish.
Storage, make-ahead, variations, and serving
Storage:
- Refrigerate: Keep the pie covered and chilled. It’s best within 48 hours, though it will hold 3–4 days. The crust remains crisper for the first two days.
- Cover smartly: Use a tall cake dome or invert a large bowl over the pie to avoid smushing the whipped cream. Plastic wrap pressed lightly over the pie ring can also work if your topping is stable.
- Freezing: The baked-custard version does not freeze well (custard can weep upon thawing). The no-bake cream cheese variant can sometimes freeze better; freeze without whipped topping, tightly wrapped, up to 1 month. Thaw overnight in the refrigerator and top fresh.
Make-ahead strategy:
- Day 1: Blind-bake crust, make crumbs, cook custard, assemble base, and chill overnight.
- Day 2: Add whipped topping and garnish 30–60 minutes before serving.
- For no-bake versions: Assemble the crust, crumb, and filling the day before; add topping the day of.
Variations to keep rotation exciting:
- Chocolate ribbon: Swirl 1/3 cup warm chocolate ganache through the warm custard after pouring into the crust. Don’t overmix; you want dramatic streaks.
- Banana-peanut riff: Arrange thin banana slices over the crumb layer before adding custard; serve within 24–36 hours for best texture.
- Meringue topping: Skip whipped cream and top warm custard with Swiss meringue, then torch lightly. Keep in mind meringue is best day-of.
- Oreo crust: Replace graham crackers with crushed chocolate sandwich cookies for a richer base that loves the peanut notes.
- Salted peanut brittle crunch: Crush thin brittle and sprinkle sparingly at serving time to avoid sogginess.
- Maple touch: Replace 2–3 tablespoons of sugar in the custard with real maple syrup for an earthy caramel nuance.
Serving ideas:
- Slice with warm, dry knife for clean cuts.
- Plate with a drizzle of warm peanut butter sauce and a few sea salt flakes to wake up the sweetness.
- For gatherings, pre-slice and garnish each wedge with a small peanut butter crumb cluster for a tidy buffet presentation.
Food safety and allergy notes:
- Peanut allergy: This recipe is not suitable for those with peanut allergies. For a similar experience, try almond butter crumbs if appropriate for your guests, but warn them of tree nuts.
- Eggs: The custard is fully cooked when thickened properly; ensure safe storage and chilling.
- Gluten-free: Choose a gluten-free cookie crust or a certified gluten-free graham cracker crumb; verify that all ingredients are certified GF if needed.
With smart planning and a few small upgrades, your pie will taste bakery-level and slice like a dream.
Troubleshooting and expert tips for perfect results
Custard confidence:
- Control the heat: Medium heat and constant whisking prevent scorching and curdling. If you see a thick layer forming quickly, drop the heat and whisk more vigorously.
- Thicken to the right point: Look for big, slow bubbles and a thick, glossy texture that leaves tracks from the whisk. If you stop too soon, the chilled pie may slump.
- Strain for silk: A quick pass through a fine-mesh sieve removes any tiny bits and adds a professional finish.
Crust mastery:
- For pastry crusts: Keep everything cold. Chill the lined pan to reduce shrinkage, and don’t skip docking and weights.
- For graham crusts: Press firmly with a flat-bottomed measuring cup. Bake briefly to set butter and reduce crumbling.
Crumbs that behave:
- Aim for dry crumbs. Too much peanut butter leads to a sticky layer that blends into the custard instead of staying distinct.
- Taste test: A whisper of salt amplifies peanut flavor and balances the cream.
Topping that holds:
- Chill your bowl and beaters for whipped cream.
- For outdoor events or long holds, stabilize with cream cheese or gelatin.
- Don’t overbeat: Grainy whipped cream collapses quickly.
Serving scene:
- Temperature sweet spot: Slightly warmer than refrigerator cold gives the custard its best texture and flavor.
- Clean cuts: Wipe the knife between slices; a pie server with a sharp edge helps separate the crust cleanly from the dish.
Common mistakes to avoid:
- Filling a warm crust with cold custard (or vice versa) can create condensation and weeping. Pair warm with warm or room temp to help layers settle evenly, then chill.
- Using natural peanut butter without adjustment can cause oily crumbs. Add extra powdered sugar until dry and pebbly.
- Not chilling long enough. Four hours is a bare minimum; overnight is better for clean slices.
These small details separate a good pie from a great one—and ensure your Amish Peanut Butter Cream Pie turns out consistently impressive.
Step-by-step recipe card (classic baked-custard version)
Yield: 1 pie (8 slices)
Active time: About 40 minutes
Chill time: 4–8 hours
Ingredients:
- 1 9-inch pastry or graham cracker crust, fully cooled
- Peanut butter crumbs:
- 1/2 cup creamy peanut butter
- 1/2 to 3/4 cup powdered sugar
- Pinch fine salt (if peanut butter is unsalted)
- Custard:
- 2 cups whole milk
- 1/2 cup heavy cream (optional)
- 2/3 cup granulated sugar
- 1/4 cup cornstarch
- 1/4 teaspoon fine salt
- 4 large egg yolks
- 2 tablespoons unsalted butter
- 1 1/2 teaspoons vanilla extract
- Topping:
- 1 cup heavy cream
- 2–3 tablespoons powdered sugar
- 1 teaspoon vanilla
- Optional: 1 ounce softened cream cheese or 1 teaspoon unflavored gelatin for stability
- Garnish: Remaining peanut butter crumbs, chocolate shavings (optional)
Directions:
- Prepare crust: Par-bake a pastry crust and cool fully, or bake a graham crust 8–10 minutes and cool.
- Make crumbs: Mix peanut butter and powdered sugar with a fork until dry, pebbly crumbs form. Scatter two-thirds over the cooled crust.
- Start custard: Off heat, whisk sugar, cornstarch, and salt in a saucepan. Whisk in milk and cream until smooth.
- Cook: Heat on medium, whisking until steaming and slightly thickened.
- Temper yolks: Whisk yolks in a bowl. Slowly whisk in a ladle of hot milk mixture, then a second ladle.
- Finish custard: Return yolk mixture to saucepan and cook, whisking, until thick and bubbling. Remove from heat. Whisk in butter and vanilla. Strain if desired.
- Assemble: Pour warm custard over crumbs in the crust. Smooth the top. Press plastic wrap directly on custard and chill 4–8 hours.
- Whip topping: Beat cream (and cream cheese or gelatin if using) to medium peaks with powdered sugar and vanilla.
- Finish: Remove wrap, spread or pipe whipped cream over set custard. Garnish with remaining crumbs and optional chocolate. Chill 30 minutes before slicing.
Serving: Slice with a warm, dry knife for clean wedges. Enjoy within 2–3 days for peak texture.
Conclusion
Amish Peanut Butter Cream Pie is a humble masterpiece: simple pantry staples, thoughtfully layered into a dessert that feels nostalgic yet special. With a crumbly peanut butter base, a silky custard core, and a soft crown of whipped cream, it earns a regular place in your dessert rotation. Use the classic baked-custard method when you want a bakery-style slice, the no-bake version for busy days, and the storage and serving tips here to keep every piece picture-perfect. Once you master this, you’ll have a reliable, crowd-pleasing Amish Peanut Butter Cream Pie for any occasion.
FAQ
How long does Amish Peanut Butter Cream Pie keep in the refrigerator?
It’s best within 48 hours and still good up to 3–4 days when covered and chilled. The crust stays crispest for the first two days.Can I use natural peanut butter in the crumbs?
Yes, but stir it very well and add extra powdered sugar until the crumbs are dry and pebbly. Natural peanut butter can be oily, so adjust to avoid sticky clumps.Can I freeze Amish Peanut Butter Cream Pie?
The classic custard version doesn’t freeze well. For better results, freeze the no-bake cream cheese variation without the whipped topping, wrapped tightly, up to 1 month. Thaw overnight and add fresh topping.How do I prevent a soggy crust?
Fully bake and cool your crust, keep crumbs fairly dry, and pour the custard warm so layers meld without condensation. A thin chocolate “seal” brushed on a pastry crust also guards against moisture.Is there a gluten-free option for this pie?
Yes. Use a gluten-free cookie crumb crust or certified gluten-free graham crackers. Ensure all other ingredients are certified gluten-free as needed.