
Safe water isn’t optional—it’s the foundation of every preparedness plan, road-trip kit, and long-term homestead strategy. Yet most people who “have water stored” are making at least one of the 6 deadly water storage mistakes that can turn a well-meaning stash into a health hazard or a logistical nightmare. This guide shows you what those mistakes are, why they matter, and exactly how to fix them for good. If you’re short on space or want a more modular setup, solutions like SmartWaterBox can help you store more safely and accessibly without re-inventing your whole system.
Below, you’ll learn best practices for containers, sanitation, disinfection, storage locations, rotation schedules, and redundancy. You’ll also see how to calculate the right volume for your household (including pets), and how to protect your supply from extreme temperatures, UV light, and contamination—all with simple, affordable steps.
Table of Contents
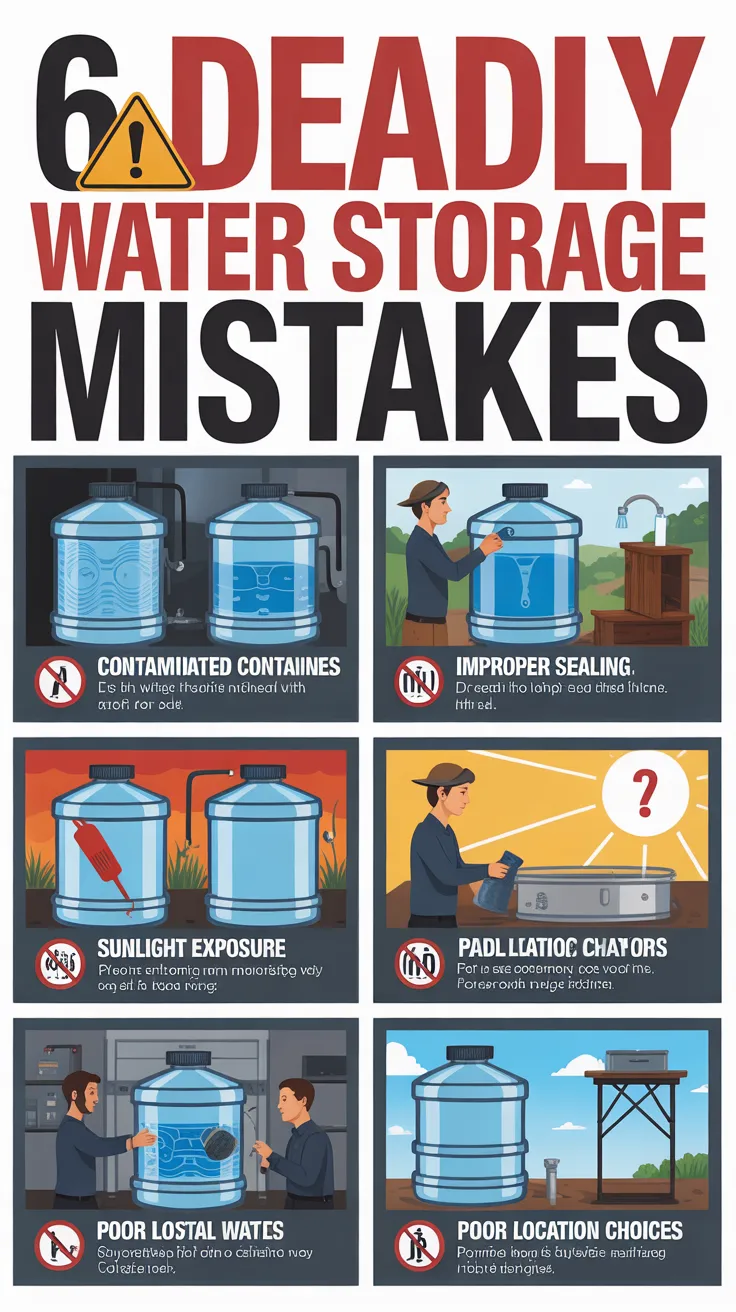
Mistake 1: Using the wrong containers
Choosing the wrong container is the fastest way to spoil otherwise good water. Not all plastics are created equal, and not every “clean bottle” is safe for long-term storage.
- Non–food-grade plastics can leach chemicals into water over time—especially in warm conditions. Look for “food-grade” labeling and the resin code HDPE #2, PP #5, or PET/PETE #1 for containers that are commonly safe for food contact. HDPE #2 is the go-to for durable, reusable storage.
- Thin, disposable bottles are meant for short-term use. They can crack, warp, or puncture under weight or temperature swings, risking slow leaks or sudden failure.
- Repurposed milk or juice jugs are risky. Milk fats and sugars cling to microscopic pores even after cleaning, creating a breeding ground for bacteria and biofilms that can foul your water.
- Metal containers may corrode or react with disinfectants. Stainless steel can be safe for short-term transport or boiling, but avoid treating water with chlorine in metal containers unless the manufacturer approves it.
Safer choices include purpose-built water bricks, 5–7 gallon HDPE jugs, 15–55 gallon food-grade drums, stackable modules, and sealed commercial water cases. Tap or well water that’s going into long-term storage should be put only into sanitized, food-grade containers with secure lids and spigots designed for potable water.
Practical tips for container selection:
- Use thick-walled, opaque, food-grade containers to block light and resist impact.
- Standardize container sizes to simplify stacking, transport, and rotation.
- Prefer spigots that sit above the bottom to limit sediment disturbance.
- Label each container with fill date, source, and treatments used (e.g., boiled, chlorine added).
- Keep a few smaller “grab-and-go” containers (1–2 gallons) filled for rapid evacuation.
If you want a modular system that stacks safely and pours without lifting heavy drums, a kit like SmartWaterBox can streamline your container strategy while staying within best practices.
Mistake 2: Storing water in light, heat, or fluctuating temperatures
Even great containers can’t protect water from bad storage conditions. Heat accelerates chemical leaching and degrades chlorine residuals; UV light encourages algae; freezing can crack containers and break seals; rapid temperature swings stress plastics and fittings.
What to avoid:
- Direct sunlight, south-facing windows, and bright garages with skylights.
- Hot attics, sheds, and car trunks where temperatures can soar.
- Freezing basements or uninsulated porches that risk container rupture.
- Shelves near furnaces, water heaters, or dryers.
Best storage environments:
- Cool, dark, inside spaces: interior closets, under-bed drawers, crawl spaces, utility rooms.
- Temperature range: as stable as possible; below 70°F is ideal, but prioritize stability and darkness over chasing a perfect number.
- Off-floor storage: keep containers a few inches off concrete (e.g., on pallets or foam board) to reduce temperature transfer and chemical wicking, and to protect from minor flooding.
- Dust covers: opaque bins, tarps, or cabinets to block light and reduce dust that can contaminate fittings during dispensing.
Heat is particularly brutal on bottled water taste and safety due to accelerated plastic degradation. If your only option is a garage or shed, mitigate the risk:
- Place containers on pallets, away from walls and windows.
- Add reflective barriers (e.g., foam board with foil) and ventilation to limit heat buildup.
- Use opaque or dark containers to block light.
- Increase rotation frequency (e.g., refresh every 3–6 months instead of annually).
For households with limited indoor space, consider distributing water across multiple cooler spots—some indoors, some in shaded areas—rather than putting everything in a hot outbuilding.
Mistake 3: Skipping water treatment and proper rotation
Assuming “it came from the tap, so it’s fine forever” is a dangerous myth. Stored water can lose residual disinfectant over time, and any contamination introduced during filling can grow. Similarly, untreated well or surface water can harbor pathogens that become more dangerous in sealed, warm conditions.
Basic treatment options:
- Boiling: Bring water to a rolling boil for at least 1 minute (3 minutes above 6,500 feet). Cool before storing.
- Chlorination with unscented household bleach: Use regular, plain, unscented bleach with no additives. For 6% bleach, add 8 drops (1/8 teaspoon) per gallon of clear water. For 8.25%, add 6 drops per gallon. If water is cloudy, pre-filter and consider doubling the dose. Let stand 30 minutes before sealing. Always verify concentration on the label and adjust accordingly.
- Ready-made purification systems: Gravity-fed or integrated systems simplify treatment and re-treatment at the point of use. A countertop tower like Aqua Tower can give you an on-demand purification layer for day-to-day and emergencies.
- Long-term storage tabs: Commercial water treatment tablets can help with initial treatment; follow manufacturer guidance exactly.
Rotation matters, even for “clean” water:
- Stored tap water: Many agencies recommend refreshing every 6 months.
- Sealed, commercially bottled water: Can last years unopened if stored cool and dark, but rotating annually preserves taste and confidence.
- After opening any container: Consume within a few days and keep it covered. Don’t return unused water to long-term containers.
Create a simple rotation system:
- Label every container with “Filled on” and “Use by” dates.
- Stagger fill dates so you’re rotating a portion each month.
- Use first-in, first-out (FIFO) like a pantry: consume the oldest first.
- If water is still clear, odor-free, and taste is acceptable but past your ideal rotation window, repurpose it for non-potable tasks (cleaning, flushing) and replace your potable supply.
Remember: treatment at storage time and purification at the point of use are two different safeguards. Using a home-friendly purification option like Aqua Tower provides redundancy if your stored water’s taste or quality ever seems questionable.
Mistake 4: Poor sanitation during filling and dispensing
Pathogens rarely “appear” in clean water; we put them there through sloppy handling. A single unclean funnel or handprint can seed bacteria that multiply in storage.
Sanitation before filling:
- Wash hands thoroughly.
- Clean containers, caps, spigots, and funnels with hot soapy water; rinse well.
- Sanitize with a mild bleach solution (e.g., 1 tablespoon bleach per gallon of water), coat surfaces, let sit for 2 minutes, then air-dry or rinse with treated water.
- Sanitize hoses and siphons too; potable-water hoses are different from garden hoses. Dedicate a labeled “drinking water only” hose.
Filling best practices:
- Fill from a safe source: treated municipal tap or properly disinfected well water. For surface water, pre-filter and disinfect before storage.
- Minimize splash and contact: use a clean funnel, keep caps and threads clean.
- Leave a small air gap at the top of rigid containers for expansion and to reduce stress on seams.
Dispensing safely:
- Use spigots instead of removing caps to reduce contamination.
- Don’t dip cups or ladles into stored containers; pour into a clean container instead.
- Keep the spigot area clean and covered when not in use.
- Train family members on the “no-dipping” rule and handwashing before handling water.
Equipment to simplify hygiene:
- Dedicated water-only funnels, towels, and brushes stored in a clean, sealed bin.
- A small spray bottle with a mild sanitizing solution for fittings.
- Point-of-use purification: run dispensed water through a gravity system or filter for an extra margin of safety. If your supply is off-grid or intermittent, a resilience-minded option like Joseph’s Well can support collection and treatment workflows without relying on electricity.
Good sanitation is the quiet backbone of any water plan. It’s what turns “decent containers” into a truly reliable drinking supply over months and years.
Mistake 5: Ignoring volume, access, and redundancy
Too many plans end at “We have a few cases of water” without considering how much is needed, how to reach it in a blackout, or what happens if a single container fails.
How much water do you really need?
- Minimum planning baseline: 1 gallon per person per day (drinking + minimal hygiene/cooking).
- Practical target: 2–3 gallons per person per day for more comfortable hygiene and cooking; more in hot climates, for pregnant/nursing individuals, or when doing physical work.
- Time horizon: Aim for at least 3 days, then build toward 14 days. For rural or disaster-prone areas, 30 days (or more) can make sense.
- Don’t forget: Pets (most dogs need 1 ounce per pound per day; cats less but plan generously), infant formula, medical needs, and water-heavy foods like pasta or rice.
Access matters as much as capacity:
- Heavy drums (30–55 gallons) are efficient but hard to move and dispense without pumps or hand siphons. Ensure you have the tools to access them when power is out.
- Stash water on every floor of a multi-level home to avoid carrying heavy loads up stairs during emergencies.
- Mix container sizes: large drums for bulk, mid-size jugs for daily use, and small containers for evacuation.
Redundancy is resilience:
- Store treated water AND have purification at the point of use (filter, chemical, or boiling).
- Diversify sources: municipal tap, rain capture (where legal), well or surface water with treatment, plus sealed commercial cases for grab-and-go.
- Duplicate critical components: extra spigots, gaskets, and a backup method to move water.
- If your area faces frequent outages or supply disruptions, consider an off-grid-friendly approach like Joseph’s Well to augment your stored volume with renewable collection and treatment.
Finally, remember that a water plan is a household-wide habit. Walk through how each family member would access and use water in a dark, stressful scenario—then adjust your layout, tools, and labels accordingly.
Mistake 6: Storing water in unsafe locations or near hazards
Water storage sometimes gets squeezed into garages, mechanical rooms, or sheds—places that also house chemicals, fuel, and tools. Proximity to hazards can compromise your water in subtle or dramatic ways.
Keep water away from:
- Gasoline, diesel, kerosene, propane cylinders.
- Paints, solvents, pesticides, pool chemicals, and cleaning agents.
- Batteries and charging stations that off-gas.
- Areas with heavy vibration (near washers/dryers) that can fatigue seals over time.
Structural and environmental risks:
- Earthquake zones: Strap tall stacks and drums to studs; avoid glass nearby; use anti-slip mats for stacked modules.
- Flood zones: Store above projected flood levels; use elevated shelving; keep a secondary cache on higher floors.
- Fire safety: Maintain clear egress paths. Water is nonflammable, but bulky storage can block exits.
- Sun and frost: Keep containers away from exterior walls that experience extreme heat or cold.
Shelf and stack safety:
- Follow manufacturer stacking recommendations for modular containers. Overstacking can deform lower containers and create slow leaks that go unnoticed until too late.
- Use sturdy, level shelving rated for the weight (water is ~8.34 lb per gallon). Reinforce shelves if unsure.
- Place heaviest containers on lower shelves to lower the center of gravity.
A safer layout usually means multiple small clusters, not one massive cache. Distribute water across the home to reduce the impact of any single leak, contamination, or localized hazard. If you need a compact, stack-friendly system that keeps water off the floor and in the dark, the modular design of SmartWaterBox can help fit storage into safe nooks and closets.
How to avoid the 6 deadly water storage mistakes
Eliminating the biggest risks doesn’t require expensive gear. It takes a process you can repeat every time you fill or rotate.
Step-by-step process:
Choose the right containers
- Food-grade, opaque HDPE (#2) or equivalent.
- Mix sizes for bulk, daily use, and evacuation.
- Inspect for cracks, warped lids, or brittle spots before every fill.
Prepare and sanitize
- Wash and sanitize containers, caps, funnels, hoses.
- Wash hands; work on a clean surface.
Fill and treat
- Fill from a safe source.
- Disinfect via boiling, appropriate bleach dosing, or tablets.
- Record the fill date, treatment method, and use-by date.
Store smart
- Cool, dark, stable temperatures.
- Off the floor, away from chemicals and heat sources.
- Secure stacks and drums against tipping.
Rotate and test
- Rotate tap-stored water every 6 months; swap in fresh cases annually.
- Smell and visually inspect before use.
- Purify at the point of use with a gravity system like Aqua Tower for an added layer of safety.
Build redundancy
- Keep multiple treatment methods on hand (boiling setup, bleach, filtration).
- Consider off-grid collection/treatment capacity through solutions like Joseph’s Well.
- Maintain spare parts and backup spigots.
This simple loop—sanitize, fill, treat, store, rotate—turns water storage from a one-time project into an ongoing protective habit.
Practical layouts for apartments, homes, and homesteads
Your environment determines how you should store and access water. Here’s how to tailor your setup.
Apartments and small spaces:
- Under-bed storage with low-profile, stackable modules.
- Closet shelves with small jugs for daily use; bulk reserve in the coolest interior closet.
- Split supply between two rooms in case one area becomes inaccessible.
- Use modular, spill-resistant options like SmartWaterBox for safe stacking and easy rotation.
- Keep a lightweight gravity purifier on the counter for daily use; it doubles as your emergency system.
Suburban homes:
- Mix a 55-gallon drum or two with several 5–7 gallon jugs for flexibility.
- Place smaller caches on each floor and in bedrooms in case a storm or earthquake blocks access.
- Near the kitchen, store a few cases of sealed bottled water for quick rotation and guests.
- Protect garage-stored water from heat with reflective barriers or move to a basement or interior closet if possible.
Homesteads and rural properties:
- Add water catchment (where legal) and treatment to supplement storage during long outages.
- If using a private well with electric pump, plan for no-power access: hand pump, generator transfer, or gravity-fed storage.
- Integrate purification at point-of-use for everyday resilience so you’re training with your tools before a crisis.
- Build larger, distributed caches to hedge against well contamination or access issues.
Across all settings, make water as easy to use as it is to store. If your system is cumbersome, your family won’t rotate it—and that’s how good water goes bad.
Recommended tools and resources for safer water storage
You don’t need every gadget, but a few well-chosen tools make storage safer, rotation easier, and quality more consistent.
Smart, modular storage
- SmartWaterBox: A modular approach that helps you stack, protect from light, and dispense without heavy lifting.
Point-of-use purification
- Aqua Tower: A gravity-based purifier that adds a dependable, electricity-free treatment step for daily and emergency use.
Off-grid collection and resilience
- Joseph’s Well: A complementary solution for sourcing and treating water if municipal lines fail or power is out.
Planning and food complement
- The Lost SuperFoods: For those also building a shelf-stable pantry, this can help balance your water plan with foods that are efficient to store and prepare.
Choose only what fits your space, climate, and budget. Consistent habits beat expensive gear left unused.
A realistic weekly routine to keep water safe and ready
Turning good intentions into habits keeps your system alive. Use this simple rhythm:
Sunday five-minute check
- Walk past your main storage areas. Check for leaks, warmth, sunlight, and obstructions.
- Wipe spigots and fittings with a clean cloth.
Monthly rotation
- Swap one or two containers into daily use and refill them.
- Review labels for upcoming “use by” dates.
Quarterly sanitation
- Deep-clean and sanitize frequently used containers, funnels, hoses.
- Inventory bleach, tablets, and filter elements; replace as needed.
Seasonal adjustments
- Summer: Increase rotation if storage is warmer. Check for algae growth in any translucent containers.
- Winter: Protect from freezing; move containers away from exterior walls; check seals that may have shrunk in the cold.
Annual audit
- Recalculate household needs (new family members, pets, medical changes).
- Practice an “outage day” with only stored water to test access and consumption.
- Update your plan and labels, and consider upgrades like Aqua Tower for point-of-use redundancy.
This routine keeps the system fresh with minimal effort and reveals weak spots before they become emergencies.
Checklist to eliminate the 6 deadly water storage mistakes
Use this quick-reference list to harden your plan:
Containers
- Food-grade, opaque, inspected for cracks.
- Mixed sizes; labeled with fill date and treatment.
Treatment
- Boil or add unscented bleach at the correct dose (verify concentration).
- Have point-of-use purification ready.
Sanitation
- Clean, sanitized funnels, hoses, caps.
- “No dipping” rule; use spigots to dispense.
Storage conditions
- Cool, dark, stable temperature.
- Off the floor; away from chemicals and heat.
Rotation
- Tap-stored water every ~6 months; sealed cases annually.
- FIFO; repurpose out-of-date water for non-potable tasks.
Redundancy
- Multiple sources and treatment methods.
- Tools to access heavy containers during outages.
Safety and placement
- Strapped stacks; safe distances from hazards.
- Distributed caches across the home.
Print this checklist and keep it with your water supplies. The fewer decisions you need to make during stress, the better your outcomes.
Conclusion
Avoiding the 6 deadly water storage mistakes is about mastering fundamentals: use the right containers, protect from heat and light, disinfect correctly, handle with strict hygiene, store the right volume with redundancy, and keep water away from hazards. Do that, and your water becomes a reliable asset—not a liability—when you need it most. If you want an easy win today, start by upgrading your container setup with a modular system like SmartWaterBox and add a point-of-use safeguard such as Aqua Tower. Then set a reminder to rotate and you’re already ahead of 90% of households.
FAQ
How much water should I store per person?
A minimum of 1 gallon per person per day is the baseline for drinking and minimal hygiene. Aim for 2–3 gallons where possible, especially in hot climates or for larger families, and build toward at least 14 days of supply.How often should I rotate stored tap water?
Refresh stored tap water about every 6 months. Sealed, commercially bottled water can remain good for longer if cool and dark, but rotating annually helps maintain taste and confidence.What’s the safest container for long-term water storage?
Use food-grade, opaque HDPE (#2) containers or purpose-built water storage modules. Avoid repurposed milk or juice jugs and thin disposable bottles for long-term storage.How do I treat water for storage with bleach?
Use regular, unscented household bleach with no additives. For 6% bleach, add 8 drops (about 1/8 teaspoon) per gallon of clear water; for 8.25%, add 6 drops per gallon. Let stand for 30 minutes. Always verify the bleach concentration on the label and adjust accordingly.How can I avoid the 6 deadly water storage mistakes in a small apartment?
Choose modular, stackable, food-grade containers; store in the coolest, darkest interior spaces; rotate small batches monthly; and add a countertop gravity purifier for redundancy. A compact system like SmartWaterBox can make small-space storage safer and easier to manage.