
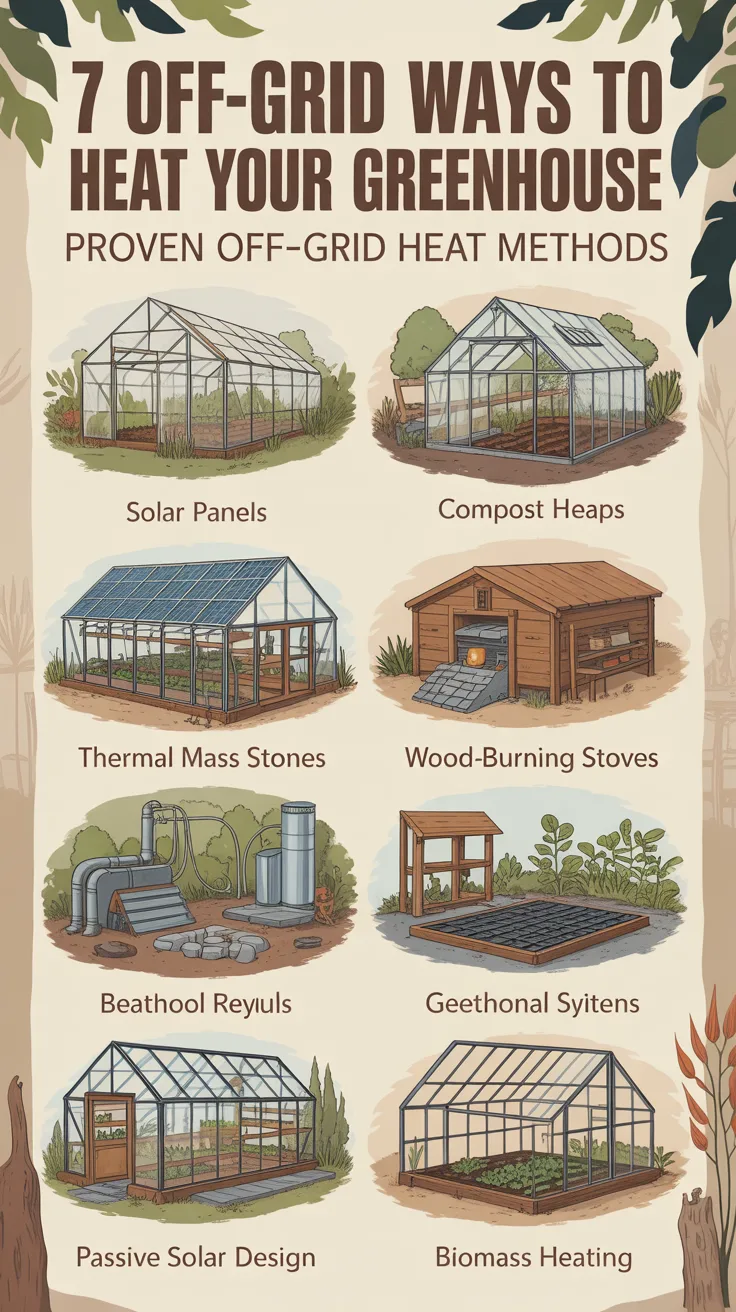
Keeping crops alive through shoulder seasons and winter without plugging in space heaters is the holy grail for homesteaders. This guide walks you through 7 offgrid to Heat Your Greenhouse ideas that actually work, drawn from passive solar design, regenerative gardening, and ultra-efficient combustion. You’ll learn how to combine heat sources, storage, and retention so your greenhouse rides through cold snaps with minimal fuss.
Before you start, note that the best off-grid greenhouse heat plan layers strategies. Think: capture daytime solar heat, store it in thermal mass, release it at night, and tighten up insulation so you lose as little as possible. As a bonus, many of these methods cut water use and stabilize humidity while improving plant health.
If you plan to use water barrels as heat sinks, start by securing a safe, reliable off-grid water source. Systems like the Aqua Tower can help you collect and stage water you’ll later repurpose as thermal mass for steady, passive warmth. Explore the Aqua Tower here: Aqua Tower
Table of Contents
Thermal Mass Water Barrels for Slow, Steady Heat
Thermal mass is your first line of defense. Water absorbs heat roughly four times better than concrete per unit mass, so black-painted barrels are a classic, low-cost way to stabilize temperatures. During the day, sunlight and warm greenhouse air heat the barrels. At night, they release that stored energy slowly, shaving off harmful temperature swings.
How to set it up
- Sizing: A rule of thumb is 1–2 gallons of water per square foot of floor space in cold climates, less in mild regions. Start with what you can handle and expand.
- Placement: Line the north wall (or any non-glazed wall) with barrels to double as a thermal backstop. Paint them black or very dark to absorb more heat.
- Circulation: Position a small, solar-powered fan to loop warm air over the barrel surfaces in daylight hours and near the plant canopy at night.
- Safety: Secure barrels on level surfaces and strap them if your area experiences seismic activity or high winds.
Pro tips for performance
- Stack functions by using barrel tops as bench surfaces; top with perforated boards so air still reaches the barrel surface.
- Use a thermostatic plug or a simple bimetal thermostat wired to a 12V fan (powered by a small PV panel) to move air when temperatures cross your setpoint.
- Consider staggered mass: mix water with masonry features (raised beds with stone or brick borders) so heat release spans the whole night.
Water supply and heat synergy
In arid or off-grid scenarios, your rain capture system doubles as a heat bank. Modular tanks or stackable cubes can be concealed behind reflective foil on the north wall and connected to a greenhouse loop for year-round use. If you’re building a rain-fed system that integrates with thermal storage, a compact solution like the SmartWaterBox can help stage captured water safely before it feeds your greenhouse barrels. See more: SmartWaterBox
Maintenance and moisture
Water barrels modestly raise humidity, which benefits leafy crops but can invite disease if air stagnates. Use cross-ventilation on sunny days, and open vents at peak temperatures to purge moist air. In deep winter, crack vents during midday heat spikes to avoid condensation on glazing.
Compost Heat Bioreactor for Living Warmth
Compost is nature’s heater. A hot pile—especially a dedicated bioreactor—can push internal temperatures to 120–160°F (49–71°C) and sustain useful warmth for weeks to months. The goal is to harvest this heat safely for your greenhouse.
Two common approaches
- Internal compost bay: Build a wire-mesh bin or pallet cube along a greenhouse wall. As the pile heats, a small fan pushes warm air across it and into the plant area.
- External heat-exchanger: Place the compost pile outside and run coiled PEX tubing or black poly irrigation tubing through the pile; circulate water through the coil and into a small radiator or through a hydronic loop in the greenhouse beds.
Keys to reliable compost heat
- Feedstock mix: Aim for a carbon-to-nitrogen ratio ~25–30:1. Mix browns (shredded leaves, straw, wood chips) with greens (manure, kitchen scraps).
- Particle size: Shred materials for more surface area; wood chips roughly 1–2 inches are ideal for airflow and slow breakdown.
- Moisture: Keep the pile at “wrung-out sponge” moist. Too wet suffocates microbes; too dry stalls heating.
- Volume: Bigger piles hold heat longer. A 4x4x4 ft minimum mass helps sustain thermophilic activity.
- Airflow: Use perforated pipes or a layered core of coarse sticks to avoid anaerobic pockets.
Safety and crop health
Keep direct exhaust air from raw compost away from tender crops to prevent disease vectors and ammonia exposure. If using water coils, ensure the loop is closed and isolated from potable water to avoid contamination.
Bonus benefits
Compost heat is carbon-friendly and ends with finished compost for your beds. It also generates CO2 in small amounts, which can boost plant growth during daytime. If water security limits your compost moisture management, you can pair this system with a well or rain source. For off-grid water capture that can support compost and irrigation, see Joseph’s Well
Rocket Mass Heater for Ultra‑Efficient Combustion
Rocket mass heaters (RMHs) burn small-diameter wood at high efficiency, channeling exhaust through a long mass bench or floor run where heat is stored, then gently released. In off-grid greenhouses, this offers a controllable boost during prolonged cold spells.
Core elements
- Feed tube and burn tunnel: Where the magic happens—fast, hot combustion reduces smoke and fuel use.
- Heat riser and barrel: Creates strong draft; the outer barrel sheds immediate radiant heat.
- Thermal mass bench: Cob, brick, or stone channels soak up heat from flue gases and release it for hours.
Where to place it
- Along the north or east wall to avoid shading beds.
- On a foundation that handles weight and insulates from ground moisture (e.g., foam glass, perlite-clay base).
- With a flue routed through the mass and vented safely outside.
Operation tips
- Fuel: Dry sticks and small splits; moisture kills performance.
- Burn cycle: Short, hot burns are most efficient. Plan evening burns so thermal mass coasts through the night.
- Air management: A dedicated intake improves draw in tight structures.
Safety and compliance
- Venting: Use proper flue materials and clearances around combustibles. Install a CO monitor even in a greenhouse.
- Local code: Check your jurisdiction. Some areas regulate solid-fuel appliances.
- Plant protection: Position the barrel away from leaves to prevent scorching; use a reflective shield if needed.
Why it’s great off-grid
RMHs produce steady, predictable warmth without electricity. Paired with thermal curtains or water barrels, the stored heat outlasts a typical wood stove cycle. This makes the RMH one of the most powerful 7 offgrid to Heat Your Greenhouse strategies when deep freezes hit.
Ground‑to‑Air Heat Transfer (GAHT) Climate Battery
A GAHT, or “climate battery,” stores daytime heat in soil and gravel under your greenhouse and retrieves it at night via airflow. It’s a closed-loop system powered by fans—often on a small solar PV circuit—making it a core strategy in 7 offgrid to Heat Your Greenhouse plans for year-round production.
How it works
- Subsurface tubes: Perforated or smooth tubes are buried 2–4 feet below grade in a gravel bed.
- Day mode: Warm, moist greenhouse air is pushed underground. Heat and moisture condense in the cool gravel, warming the mass.
- Night mode: Cooler air is drawn through the now-warm gravel, picking up stored heat and releasing it back into the greenhouse.
Design highlights
- Sizing: Larger houses benefit from multiple circuits in parallel. Even a small house can use one to two circuits to stabilize shoulder seasons.
- Drainage: Include a sump or drainage layer to keep water from pooling in the tubes.
- Filtration: A simple prefilter reduces dust and biological buildup in tubing.
- Fan power: Many growers run DC inline fans off a dedicated photovoltaic panel with a charge controller and battery, so it runs regardless of grid outages.
Advantages beyond heat
- Humidity control: The system condenses and re-evaporates moisture, smoothing humidity swings.
- Soil warmth: Boosted root zone temperatures can accelerate growth in winter.
- Longevity: Once installed, maintenance is minimal beyond fan upkeep and filter cleaning.
Practical considerations
- Excavation: Plan during initial build or a summer retrofit when you can open floors.
- Cost/benefit: Materials are relatively inexpensive; labor is significant but pays back in stable winter temps and reduced supplemental heating.
- Integration: Combine with thermal curtains and water barrels to create multiple “layers” of thermal inertia.
Solar Air Heaters and Thermal Chimneys
Solar air heaters are dark, insulated boxes with glazing that heat air using sunlight. With a simple fan, they push hot air into your greenhouse during the day. A solar chimney—an insulated, sun-warmed vertical channel—can also drive passive airflow, pulling cool air through thermal mass and exhausting warm, moist air.
DIY solar air heater basics
- Collector box: Insulated backing with a black absorber (corrugated metal, aluminum cans, or fins).
- Glazing: Twin-wall polycarbonate or tempered glass improves efficiency.
- Air path: Bottom intake, top outlet, sometimes with a baffle to increase contact area.
- Power: A small PV panel can drive a DC fan; match fan size to collector output.
Placement and use
- South-facing exterior wall or freestanding frame angled to winter sun.
- Duct into the greenhouse high on the wall to deliver hottest air.
- Pair with a thermostat so it runs only above a target temperature.
Thermal chimney strategy
- Build a tall, dark chimney that heats in the sun and creates a pressure differential.
- Place low intake vents near thermal mass so incoming air sheds heat at night.
- Use adjustable dampers to control flow in cold snaps.
Why it works off-grid
These systems convert solar gain to hot air without complex controls, making them robust and low-maintenance. They shine in sunny winter climates and during shoulder seasons, and combine beautifully with GAHT and water barrels to bank surplus heat.
Solar Hydronic Heating with Batch Heaters
Solar hydronic systems capture heat in water and move it into the greenhouse via radiators or in-bed tubing. The simplest off-grid approach uses a batch heater—essentially a dark, insulated tank behind glazing that warms water each sunny day.
Core components
- Collector: A batch tank or flat-plate collector with copper or PEX coils.
- Storage: Insulated tank or barrels to hold heated water.
- Distribution: A small pump (DC solar pump) pushes hot water through a loop. Passive thermosiphon is possible if the tank is below the collector and the greenhouse loop is higher.
- Emitters: Radiators, fin-tube baseboard, or PEX in soil beds.
Design considerations
- Freeze protection: Use closed loops with glycol, or drain-back designs that empty when not heating.
- Control: A differential temperature controller or simple snap switch wired to a DC pump turns the system on when the collector is warmer than storage.
- Safety: Keep potable water isolated if using glycol; label loops clearly.
Why choose hydronic
Water carries heat efficiently and can deliver gentle, even warmth at the root zone—often the difference between survival and thriving. Hydronic loops also dovetail with compost heat exchangers for hybrid setups.
Integration ideas
- Charge your thermal barrels with a collector loop by day, then passively radiate at night.
- Combine with a rocket mass heater coil to scavenge excess burn heat into a safe, closed circuit.
- If water capture is part of your homestead plan, modular storage can do double duty as heat storage and irrigation reserve. Tools like SmartWaterBox or rain-to-well guides such as Joseph’s Well can round out your system without grid dependence: Joseph’s Well
Heat Retention: Insulation, Glazing, and Nighttime Strategies
Every BTU you don’t lose is one you don’t need to generate. For many growers, dialing in retention delivers the best return on effort. This is a centerpiece of 7 offgrid to Heat Your Greenhouse strategies because it compounds the value of every other method.
Glazing upgrades
- Double layer with an air gap: Use double poly or twin-wall polycarbonate to raise R-value.
- Seasonal inner film: Add a second interior layer in winter with 6–12 inches of air gap; seal edges to limit infiltration.
- Bubble wrap: Larger greenhouse-grade bubbles on interior walls diffuse light and insulate.
Nighttime thermal curtains
- Install retractable thermal curtains or quilts under the roofline. These cut radiative losses after sunset and trap warm air near the crop canopy.
- Close just before dusk and open after sunrise to avoid shading during morning heat gain.
Draft control and sealing
- Seal door frames and repair tears in poly promptly.
- Use automatic or manual vents judiciously: purge humidity and excess heat midday, then close tight before temperatures fall.
Internal microclimate layers
- Low row covers inside the greenhouse create a microclimate 3–7°F warmer around crops. Use spunbond fabric on hoops over beds to protect during hard freezes.
- Cloche covers or mini-tunnels protect sensitive starts and extend shoulder seasons even if the main space dips.
Thermal mass beyond water
- Brick or stone pathways, raised bed walls, and even soil moisture contribute to heat storage.
- Consider modest phase-change materials (PCMs) if you can source them safely; they store and release heat at specific temperatures.
Health and safety
- Watch for condensation and fungal pressures. Vent briefly at midday, even in winter, to keep foliage dry.
- Monitor with min/max thermometers at soil and canopy heights to fine-tune covers and curtain timing.
Putting It All Together: A Layered Off‑Grid Heat Plan
Here’s how to combine the seven methods for robust, resilient heating that stays off the grid:
- Base layer: Insulation and sealing. Start by tightening the envelope and adding nighttime thermal curtains and inner glazing. These upgrades instantly amplify all other strategies.
- Passive storage: Add water barrels along the north wall and build thermal mass into pathways or raised beds for stable temperatures.
- Daytime capture: Install a solar air heater or two to pump in warm, dry air on sunny days; tie into a GAHT loop to bank that heat underground.
- Biological boost: Set up a compost bioreactor, either inside with careful airflow or outside with a hydronic coil, to supply steady background warmth during cold spells.
- Emergency and extreme cold: Integrate a rocket mass heater for controllable, high-output heat when storms and deep freezes hit.
- Hydronic polish: A small solar hot water loop can top up barrels or warm beds, especially in sunny but cold climates.
Powering the system
- Fans and pumps: Size low-watt DC devices and power them with a dedicated PV panel and battery. Simple thermostats or differential controllers keep things automatic without the grid.
- Monitoring: Place sensors at multiple heights and within covered rows. Even a basic indoor/outdoor thermometer helps you adjust venting and cover timing.
Resource readiness
- Water: Secure reliable off-grid water for both irrigation and thermal mass. If you’re building a rain-first system, solutions like Aqua Tower and SmartWaterBox can help you collect, store, and redeploy water efficiently across seasons.
- Skills and health: Cold-season growing and homestead projects run smoother when you’re prepared. Practical self-reliance guides like The Lost SuperFoods can inform your storage planning, and having a trusted home-care reference such as Home Doctor is wise for any off-grid setup.
Conclusion
Heating a greenhouse without the grid isn’t about one silver bullet. It’s about stacking complementary strategies that collect, store, and retain heat—all while maintaining plant-friendly airflow and humidity. These 7 offgrid to Heat Your Greenhouse methods give you a proven toolbox: water-based thermal mass, compost heat, rocket mass heaters, GAHT climate batteries, solar air and hydronic systems, plus strong insulation and nighttime protections. Start with retention and passive storage, add solar capture, then bring in biological or combustion heat for the coldest nights. With a layered plan, your winter greens, seedlings, and perennials stay safe, and your energy independence grows with every season.
FAQ
What is the most cost-effective off-grid way to heat a greenhouse?
Thermal mass water barrels combined with better insulation (double glazing and nighttime curtains) usually deliver the biggest improvement per dollar. They work passively, require little maintenance, and amplify the effect of solar gain you already have.
Can compost really heat a greenhouse through winter?
Yes, a well-built compost bioreactor can maintain high internal temperatures for weeks to months. You can harvest that heat by blowing air across the pile or by circulating water through coils in the pile and into a radiator. Just keep feedstock balanced, maintain moisture, and isolate compost air from delicate plants.
Is a rocket mass heater safe to use around plants?
It can be, if installed and vented properly. Keep adequate clearances, add a CO monitor, route the flue outside, and shield plants from the hot barrel with distance or reflective barriers. Many growers rely on short, evening burns that charge a mass bench to release heat gently overnight.
How does a GAHT climate battery compare to water barrels?
They’re complementary. GAHT systems store heat in the ground and regulate humidity with active airflow, while barrels provide simple, passive storage. GAHT offers more control and root-zone warmth; barrels are quick to install and inexpensive. Together, they stabilize both air and soil temperatures.
Which method should I try first if I’m new to 7 offgrid to Heat Your Greenhouse strategies?
Begin with insulation and heat retention (double glazing, thermal curtains, and row covers), then add water barrels. Once your base is tight and stable, layer in a solar air heater or small GAHT loop. Reserve compost heating and rocket mass heaters for when you’re ready to manage bioheat or combustion safely.