
Staying warm and dry can make the difference between a close call and a crisis. If you’re new to bushcraft or emergency prep, start with the basics: 3 easy survival shelters even beginner’s can make fast with minimal gear. This guide walks you through site selection, step-by-step builds, weather tweaks, insulation tricks, and common mistakes—so you can practice safely and be ready when it counts.
If you’re building skills for real-world emergencies, pair your shelter training with dependable water. A compact solution like SmartWaterBox gives you a simple way to store, filter, or transport clean water when conditions go sideways.
Table of Contents
Shelter priorities and picking the right spot
Shelter protects your core temperature. Before you build, choose a safe site and match your design to the weather, terrain, and your gear.
Priorities in the first hour:
- Stop heat loss: minimize exposure to wind and moisture.
- Choose a safe location: avoid falling hazards, flash flood zones, and dead limbs (widowmakers).
- Use what’s abundant: if you have a tarp, build with it; if not, use natural debris.
Site selection checklist:
- Look up: avoid dead trees, loose rock faces, and snow-loaded branches.
- Look down: check for drainage; pick ground that’s slightly higher than surrounding terrain.
- Look around: pick natural windbreaks (boulders, thickets), but avoid tight gullies where water channels.
- Look for resources: abundant leaves, pine needles, or dry grass for insulation; sturdy poles for structure; nearby firewood if fire is safe and legal.
- Check wind direction: face openings away from prevailing wind; use land contours to your advantage.
Seasonal tips:
- Wet weather: prioritize a tarp or poncho roof, and create a ground barrier.
- Cold weather: smaller shelters retain heat better; add extra debris insulation.
- Hot climates: create shade and ventilation; raise your bed and find airflow.
- Snow: avoid avalanche paths; compact snow before building; insulate well from the ground.
Leave No Trace:
- Build with downed wood. Return the site to natural condition when you leave.
- Keep fires small and controlled, or skip them if conditions are risky.
With a safe spot decided, you can move fast. The three builds below share a simple logic: a secure ridgeline or ridge pole, a weather-shedding roof, and ground insulation to protect you from conductive heat loss.
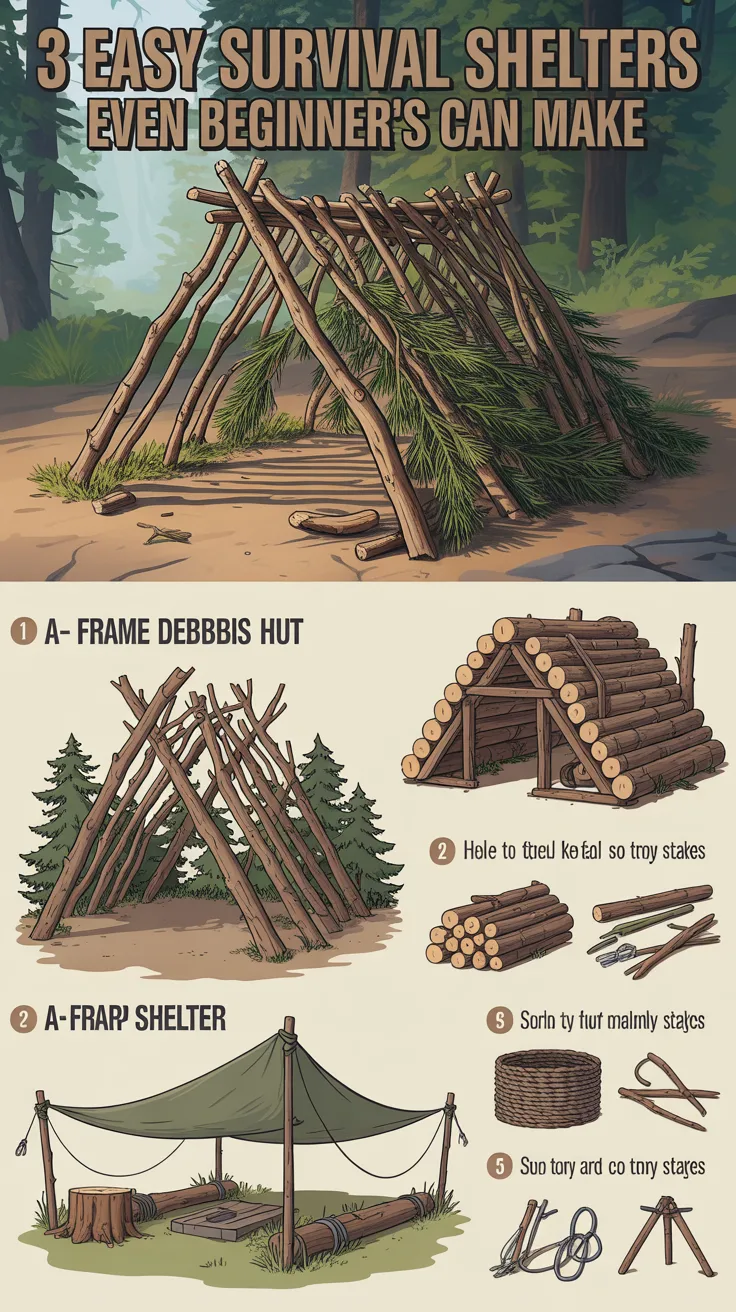
Tarp A-frame: one of the 3 easy survival shelters even beginner’s can make
If you have a tarp, this is the fastest, most forgiving shelter you can build. It sheds rain, blocks wind, and can be tightened for storms or opened for airflow.
What you need:
- 8×10 ft tarp (or larger), or a poncho with grommets
- 25–50 ft of paracord for a ridgeline (plus short lines for tie-outs)
- 6–8 stakes (sticks work)
- Optional: groundsheet, survival blanket, trekking poles, shock cord
Step-by-step:
- String a ridgeline: run paracord between two trees about 3–3.5 ft high. Use a trucker’s hitch or taut-line hitch so you can tension it quickly.
- Drape the tarp: center it over the ridgeline so equal material hangs on both sides.
- Stake the sides: pull each side to the ground and stake out. For more space, stake slightly wider; for storms, pitch low and tight to the ground.
- Close the ends: fold in corners or add a small stick to create beaks. In driving rain, drop one side to ground level for a “storm pitch.”
- Add guylines: run lines to windward corners at a shallow angle; tension until taut but not overstressed.
Storm-proofing:
- Pitch the windward side low and the leeward side slightly higher for ventilation.
- If rain is expected, create a drip line on the ridgeline: tie a short piece of cord so water drips off before it wicks into your shelter.
- Use natural anchors (rocks, buried sticks) if the soil is sandy or frozen.
Ground and warmth:
- Lay a groundsheet or pine boughs, leaves, or dry grass at least 3–4 inches thick.
- Use a reflective emergency blanket under your torso or behind you to bounce radiant heat from a fire outside and to the side of the opening (only if fire is safe).
Why it works:
- Rapid setup, adjustable height, and weather-shedding shape.
- Minimal skill investment with high payoff in rain and wind.
Practice goal:
- Time yourself. Aim for a 10–12 minute setup in calm conditions and under 8 minutes with a pre-rigged ridgeline.
Lean-to shelter for wind and fire integration
The lean-to is ideal for wind breaks and heat reflection when paired with a safe, small fire. You can build it with a tarp or purely from natural materials if you don’t have gear.
What you need (tarp version):
- 8×10 ft tarp or poncho
- Paracord or guyline
- 5–7 stakes or sturdy sticks
Tarp lean-to build:
- Set a waist-high ridgeline between two trees or use a single tree with a long branch.
- Attach one long edge of the tarp to the ridgeline with knots or clips.
- Pull the lower edge away from the ridgeline and stake it to the ground to create an angled wall.
- Angle the ridgeline slightly lower on the windward side for better protection.
Natural lean-to build:
- Find a solid ridge pole (a thick branch) about shoulder height supported by two forked uprights or between two trees.
- Lean branches against the ridge pole at a 45–60° angle, with tighter spacing on the windward side.
- Layer smaller sticks, then pile on thick debris (leaves, needles, grass) to at least a hand’s width for shed and insulation.
- Add side walls or wing walls to reduce drafts.
Fire integration:
- Build a small, controlled fire 3–5 feet in front of the opening.
- Put a simple heat reflector wall of green logs or stacked rocks behind the fire to bounce warmth back.
- Maintain good ventilation; never build a fire in an enclosed shelter.
Ground insulation:
- Use a pad, or build a raised bed of green sticks topped with soft debris.
- Elevation helps keep you dry if the ground is damp.
When to choose it:
- Cold, breezy conditions where you want maximum fire benefit.
- Open terrain where you can’t string a low, snug A-frame.
Practice goal:
- Master both tarp and natural-material versions, so you’re covered with or without gear.
If you train for accidental scrapes, burns, or splinters that can happen during shelter building and firecraft, having practical at-home medical knowledge helps. A resource like Home Doctor can guide you through common problems when professional care is far away.
Debris hut: the most forgiving no-gear cocoon
The debris hut is the classic no-tarp, no-rope shelter. It’s a small, well-insulated cocoon that traps your body heat and shields you from wind. It’s also one of the 3 easy survival shelters even beginner’s can make because it only requires branches and lots of natural debris.
What you need:
- A sturdy ridge pole roughly as long as your body plus an arm’s length
- Forked support sticks or a stump/rock to elevate the ridge pole at the head end
- Plenty of debris: dry leaves, pine needles, grass, fern, duff
- Sticks for ribs and thatching
Step-by-step:
- Build the spine: prop one end of the ridge pole 2–3 feet off the ground using a forked branch, stump, or rock. The foot end rests on the ground.
- Add ribs: lean smaller sticks along both sides of the ridge pole, spaced a fist-width apart, creating a triangular cross-section. Keep the interior just wide enough for your body.
- Weave lattice: lay thin sticks across the ribs to hold debris. This adds structure and prevents sloughing.
- Load debris: pile leaves/needles/grass at least 12–18 inches thick. Add more in cold weather. Think “porcupine” thick—if you think it’s enough, double it.
- Block wind: pay attention to the windward side and the peak near your head. Close gaps with extra debris.
- Create a small doorway: just large enough to crawl through. Use a bundle of grass or a leafy branch as a door plug.
- Insulate the floor: add a thick bed of dry material, 4–6 inches minimum.
Tips for success:
- Smaller is warmer: build just big enough for you to curl inside. Extra interior space means extra air to heat.
- Stay dry: prioritize dry debris; wet material sucks heat from you.
- Venting: leave tiny gaps near the peak for moisture to escape. Avoid complete sealing.
When to choose it:
- No gear and limited daylight: you can gather materials quickly in many forests.
- Cold nights where windbreak and insulation matter more than interior space.
Practice goal:
- Build a debris hut in 90 minutes or less with at least a fist-thick insulation layer. Then test and add more until you feel notable warmth.
Weather tweaks and seasonal upgrades
Every shelter shines in certain conditions. Make small adjustments to dramatically increase protection and comfort.
Rain:
- A-frame: pitch low, tighten guylines, add end beaks, and run a drip line on your ridgeline.
- Lean-to: if using a tarp, increase the angle to shed water; consider partial side walls.
- Debris hut: ensure the thatch is thick and angled; add a secondary debris layer mid-storm if needed.
Wind:
- Rotate openings away from wind and use natural backstops like thickets or boulders.
- Add wing walls to lean-tos; tighten the A-frame and lower the profile.
- In a debris hut, check for leaks on the windward side and reinforce with more debris.
Cold:
- Shrink interior volume. Lower the A-frame, steepen lean-to angle, and pack more debris on the hut.
- Add a reflective barrier behind the fire for lean-tos. Use a reflective blanket inside an A-frame as a heat trap (not near flame).
- Prioritize ground insulation. Most heat loss is to the ground.
Heat:
- Raise tarps higher for shade and airflow; consider a “porch” pitch on the A-frame.
- Build lean-tos facing cross-breezes for ventilation.
- In a debris hut, thin the debris if you must use it, but consider a shade-focused tarp or natural shade instead.
Snow:
- Pack snow firmly under the shelter area to prevent post-holing and sinking.
- Angle tarps to shed snow; knock accumulation off periodically.
- If snow is deep and stable, a simple snow trench with a tarp roof can outperform a lean-to in warmth. Keep an air gap for ventilation.
Ground management:
- Dig small drip trenches only if heavy rain is expected and local regulations allow; refill them before leaving.
- Elevate sleeping area with boughs or a foam pad to minimize conductive heat loss.
Season-proofing your shelter strategy means you can adapt the same core techniques to almost any environment.
Tools, knots, and quick-build tactics
You don’t need a full bushcraft loadout, but a few basic tools and knots make shelter building safer, faster, and stronger.
Minimal tool kit:
- 8×10 tarp or poncho
- 50 ft paracord plus a few short pre-tied guylines
- 6–8 lightweight stakes (or practice carving stakes)
- Fixed-blade knife or multi-tool
- Emergency blanket or bivy
- Work gloves (save your hands when gathering debris)
Knots worth mastering:
- Trucker’s hitch: fast, adjustable tension for ridgelines.
- Taut-line hitch: adjustable guyline anchor that holds under load.
- Clove hitch: quick tie-in around poles and branches.
- Prusik loops: clip tarp corners to a ridgeline and slide them to adjust pitch.
- Timber hitch: simple anchor around a tree or thick branch.
Speed hacks:
- Pre-rig tarps with corner loops and short guylines.
- Keep a 25–30 ft ridgeline pre-tied with prusik knots and clips.
- Practice one-handed stakes and wrap-and-half-hitch tie-offs.
Material sourcing:
- Ribs: dry, straight sticks around wrist thickness for structure.
- Thatch: fluffy, dry debris like oak leaves, pine needles, bracken fern, or dry grass.
- Stakes: green wood holds better than brittle dead twigs.
Safety notes:
- Cut away from your body; use a firm surface when carving stakes.
- Watch for poison ivy/oak; avoid using these plants for thatch or bedding.
- Check local regulations about cutting live wood or open flames.
Shelter skills multiply when combined with core survival knowledge. For urban-to-rural readiness, a compact training resource like URBAN Survival Code can help you adapt these techniques for city parks, greenbelts, or backyards during extended outages.
Common mistakes and how to fix them fast
Beginners often struggle not with the build itself, but with scale, orientation, and moisture control. Here’s how to avoid the pitfalls.
Shelter too big:
- Problem: excess interior air volume is hard to heat.
- Fix: rebuild smaller; lower the ridge and bring sides closer to the ground.
Wrong orientation:
- Problem: opening faces wind or storm.
- Fix: rotate or add wing walls; pitch lower on the windward side.
Poor ground insulation:
- Problem: cold seeping through the ground wakes you up shivering.
- Fix: add more debris or use a foam pad. Elevate slightly in wet conditions.
Loose ridgeline or guying:
- Problem: flapping tarp, noise, and rain pooling.
- Fix: retension with trucker’s and taut-line hitches; angle guylines shallow and away from corners.
Thin debris layers:
- Problem: cold drafts in debris huts.
- Fix: keep piling until your hand sinks into it; aim for 12–18 inches minimum.
Built in a drainage path:
- Problem: rising water or mud.
- Fix: relocate to higher ground; look for subtle ridges or knolls.
Fire too close:
- Problem: melting synthetics, smoke inhalation, or flare-ups.
- Fix: move fire 3–5 feet out; keep it small; never fire inside enclosed shelters.
Not practicing under time pressure:
- Problem: slow builds in deteriorating weather.
- Fix: schedule 30-minute drills. Simulate wind and light rain if safe.
If you’re preparing for extended disruptions that affect power, comms, and food systems, it’s smart to round out your shelter skills with food resilience and off-grid basics. Stockpile ideas from The Lost SuperFoods and consider contingency planning for blackouts with Dark Reset.
Overnight comfort, fire synergy, and insulation strategy
Your shelter’s job is to reduce heat loss from convection (wind), radiation (to the sky), conduction (ground), and evaporation (wet clothing). Get these right and nights become manageable, even comfortable.
Ground first:
- Build a debris mattress 4–6 inches thick. Upgrade with a reflective pad or closed-cell foam if you have it.
- In snow, lay a base of green boughs or foam; never sleep directly on packed snow.
Clothing and moisture:
- Strip off wet layers before bed. Use dry base layers to minimize evaporative cooling.
- Ventilate enough to reduce condensation without inviting drafts.
Fire synergy:
- Lean-to + small fire + reflector is a classic warmth combo.
- A-frame: set fire slightly offset from the opening and use a reflective blanket on the interior back wall to bounce heat. Never let flame contact synthetics.
- Debris hut: generally no fire; rely on insulation. If you must use heat, do it outside the hut and replug your door.
Hot rock technique:
- Heat dry stones near your fire, then wrap in fabric and place near your feet inside an A-frame or lean-to. Avoid river rocks that can explode; use dry, dense stones.
Venting and condensation:
- Raise one A-frame side slightly to create a draft that carries moisture out.
- Debris huts should have a modest vent near the ridge; test with your hand for escaping warm, moist air.
Nighttime checks:
- Before sleep, tension guylines, check stakes, and ensure nothing sharp is under your bed.
- Stage a small bundle of fuel within safe reach if you’re tending a heat source outside.
A simple water plan boosts comfort too. Keep a sealed container inside the shelter so you don’t need to step out at night. If you’re mapping your home resilience, pre-stage a discreet kit such as SmartWaterBox to handle storage and portability without bulky jugs.
Practice plans and quick drills to lock in skills
Skill beats gear. Set up repetition plans so shelter building becomes second nature—especially when cold, tired, or alone.
Backyard progression (four weekends):
- Weekend 1: Tarp A-frame. Goal: sub-10-minute pitch, storm-tight. Practice different tree distances and ground types.
- Weekend 2: Lean-to. Build both tarp and natural versions. Add a safe, small practice fire if permitted.
- Weekend 3: Debris hut. Focus on thick insulation. Crawl in and evaluate warmth. Add more until you feel the difference.
- Weekend 4: Timed challenge. Randomly draw which shelter to build. Add a “wind” rule—drop the ridgeline by 6 inches and orient away from a fan or breeze.
Field drills:
- 30-minute setup during golden hour. Practice choosing the site quickly and executing the build with minimal chatter.
- Wet simulation: Using a hose mist or light rain, practice pitching the A-frame low and setting drip lines, then test drainage.
- Night setup: With a headlamp, do a fast A-frame pitch. Night dexterity matters in real emergencies.
No-gear drills:
- Leave the tarp at home. Build a debris hut or natural-material lean-to. Aim for safe, clean materials and avoid sensitive habitats.
Efficiency notes:
- Pre-pack a shelter bag with a tarp, pre-tied ridgeline, stakes, gloves, and emergency blanket. Keep it near the top of your pack.
- Develop a routine: site scan → ridgeline → roof → stake/guy → ground insulation → final tension → comfort items.
Personal metrics:
- Record build time, material volume, and overnight comfort rating.
- Adjust knot choices, guyline lengths, and ridge heights to your body size and regional weather.
Simple gear add-ons that dramatically improve shelter performance
Small items can multiply the effectiveness of your shelters without adding bulk. Focus on versatility and redundancy.
Add-ons that punch above their weight:
- Mylar emergency bivy: boosts warmth and blocks wind; use inside the debris hut or A-frame.
- Shock cord loops: maintain tension on tarps as trees sway and fabric relaxes.
- Aluminum stakes: light and strong; carry a few and carve the rest from wood.
- Contractor bag: makes a fast groundsheet, vapor barrier, or extra rain panel.
- Mini carabiners or tarp clips: speed up corner adjustments without retying.
- Repair tape: fix small tarp tears on the fly.
Comfort and safety:
- Headlamp with red mode: preserves night vision while working knots.
- Bandana or shemagh: doubles as a pre-filter for debris in water, pot holder, sunshade, or sling.
- Compact first-aid kit: bandages, antiseptic wipes, blister care, and a burn gel packet.
Food and fuel:
- Keep a minimal overnight ration and a way to heat water for morale. If you’re building a deeper pantry for longer disruptions, resources like The Lost SuperFoods offer practical storage ideas that pair well with shelter and firecraft.
Knowledge compounds:
- Bushcraft, urban survival, and off-grid basics combine under stress. Consider digestible training like URBAN Survival Code and blackout-readiness guidance from Dark Reset to round out your preparedness.
Recommended gear and training resources
Shelter is one pillar. Water, medical, and knowledge complete the picture. Choose compact tools you’ll actually carry and training you’ll actually finish.
Water resilience:
- SmartWaterBox: a simple way to store and move clean water for short-term disruptions and evacuations.
Medical know-how:
- Home Doctor: practical guidance for handling common issues when professional help is far or delayed.
Skills and planning:
- URBAN Survival Code: adaptable strategies for urban and suburban environments.
- Dark Reset: preparedness for extended power outages and communications breakdowns.
Food readiness:
- The Lost SuperFoods: ideas to build a compact, long-lasting pantry that travels well with your shelter kit.
Pick one tool and one training resource to master each month. Consistency beats novelty.
Conclusion
Mastering 3 easy survival shelters even beginner’s can make—tarp A-frame, lean-to, and debris hut—gives you a reliable fallback in almost any environment. Choose a safe site, build smaller than you think, prioritize ground insulation, and adjust to weather with simple tweaks. Then practice until these moves are automatic. With water, medical, and planning layered in, you’ve built a resilient foundation for real-world emergencies.
FAQ
What are the 3 easy survival shelters even beginner’s can make with no experience?
- A tarp A-frame, a lean-to (tarp or natural), and a debris hut. These cover rain, wind, and no-gear scenarios with minimal learning curve.
How do I stay warm in a debris hut without a sleeping bag?
- Go smaller to reduce interior air, add 12–18 inches of dry debris over the ribs, and lay a 4–6 inch debris mattress. Use a mylar bivy inside for a notable warmth boost.
Is a lean-to or an A-frame better in rain?
- The A-frame generally sheds rain better because it’s symmetrical and lower-profile. Pitch the windward side low and add end beaks. A lean-to excels when you can pair it with a small, safe fire for radiant heat.
What knots should beginners learn for fast shelter setups?
- Trucker’s hitch for ridgelines, taut-line hitch for adjustable guylines, clove hitch for quick tie-ins, and a simple timber hitch around trees. Pre-rig with prusik loops to speed tarp positioning.
Can I build these shelters in snow?
- Yes, with adjustments. Pack the snow base, pitch an A-frame low and tight, and insulate heavily from the ground. For deep snow, consider a snow trench with a tarp roof and maintain ventilation to manage condensation.
What’s the fastest shelter to build if a storm hits suddenly?
- With a tarp, the A-frame is fastest—especially if your ridgeline is pre-rigged. Without gear, a quick lean-to windbreak or a minimalist debris cocoon can buy you time until conditions ease.
How small should I make my shelter in cold weather?
- Just large enough to fit you and your sleeping system with a little elbow room. Smaller interiors warm faster and waste less body heat.