
Clean drinking water is non-negotiable. Whether you’re camping, coping with a boil-water advisory, or building household resilience, learning how to make a DIY water filter gives you control when supplies run short. In the next sections you’ll get practical, safe guidance for building bottle and bucket filters, plus the crucial disinfection steps that make water biologically safer to drink.
If you prefer a ready-made solution to pair with your DIY setup, consider a dependable gravity-fed system like Aqua Tower to bridge any gaps during emergencies.
Table of Contents
Why DIY filtration matters and how it works
Before you build, it’s essential to understand what a DIY filter can and cannot do. “Filtration” and “purification” are different:
- Filtration removes physical debris: sediment, silt, rust, and some microorganisms attached to particles.
- Purification inactivates or removes pathogens (bacteria, viruses, protozoa) and sometimes chemicals. This usually requires boiling, chemical treatment, or certified filters/UV systems.
DIY filters help clear turbidity (cloudiness), which is the first and most vital step because disinfectants like chlorine work best in clear water. However, most improvised filters do not reliably remove viruses, all bacteria, protozoa, or dissolved contaminants like heavy metals, pesticides, fuel, or salts. That’s why the safest approach is multi-barrier:
- Source wisely (choose the cleanest raw water you can find).
- Prefilter to remove leaves and large debris.
- Filter to reduce fine sediment and improve clarity.
- Disinfect (boil, chemical, or UV).
- Store safely to prevent recontamination.
Choose sources carefully. Avoid water near industrial runoff, mining sites, agricultural discharge, algal blooms (bright green scums), and obvious chemical odors or sheens. If chemical contamination is suspected, do not rely on DIY filtration; use a certified system or alternate source.
Key benefits of DIY filtration:
- Improves taste and odor by reducing organic matter and using charcoal.
- Increases effectiveness of subsequent disinfection.
- Uses common, low-cost materials you can maintain at home.
Key limits:
- Does not guarantee removal of pathogens or chemicals.
- Requires consistent maintenance to remain effective.
- Flow rate vs. effectiveness is a trade-off: slower flow usually filters better.
In short, treat DIY filtration as one step in a layered water safety plan. You’ll build two setups below: a compact bottle filter for field use and a gravity bucket filter for home or base camp. Then you’ll learn the disinfection methods that complete the job.
Materials and tools for how to make a DIY water filter
Safe materials matter. Aim for clean, food-grade components and avoid anything that might leach chemicals.
Core materials
- Food-grade plastic bottle (1–2 liters) with cap, or a wide-mouth container for field filter
- Food-grade buckets (two 5-gallon buckets work well) with lids for gravity filter
- Clean gravel (pea-sized) and coarse sand
- Fine, washed sand (play sand or pool filter sand rinsed thoroughly)
- Crushed wood charcoal (from clean hardwood fire, fully cooled; not briquettes or charcoal with additives)
- Activated carbon (optional, from aquarium supply; improves taste and odor)
- Cloth or coffee filters for prefiltration (tight-weave cotton, bandana, microfiber, or paper filters)
- Rubber bands or cord
- Spigot (food-grade) for bucket system
- Drill and bits (including hole saw bit sized to your spigot)
- Mesh screen or perforated lid (optional, helps retain layers when inverted)
- Scoop, funnel, or cut bottle top to pour materials
- Unscented household bleach (for disinfection and sanitizing parts), or other disinfectant per guidelines
Sourcing tips
- Containers: Look for HDPE #2 food-grade markings. Avoid containers previously used for chemicals.
- Sands and gravels: Rinse repeatedly until the rinse water runs clear to remove dust and fine particles. Do not use visibly dirty or oily media.
- Charcoal: Use pure wood charcoal (not briquettes). Crush it to small granules, not powdery dust, to balance adsorption and flow. If you can source activated carbon, it’s even better for taste/odor reduction.
- Prefilters: Paper coffee filters or multiple layers of clean cloth increase longevity by catching larger particles early.
Sanitizing before assembly
- Wash containers, tools, and hands.
- Sanitize buckets and spigots by rinsing with a mild bleach solution (approximately 1 tablespoon unscented household bleach per gallon of water). Allow contact for 2 minutes, then rinse with clean water and air-dry.
Maintenance kit
- Spare cloth filters, extra sand/charcoal, a small brush for spigot cleaning, and a dedicated scoop to avoid cross-contamination.
The materials above let you build both a compact field filter and a household gravity system. Next, you’ll assemble the bottle filter for quick use on the go.
How to make a DIY water filter in a bottle
This portable filter improves clarity and taste using layered media. Remember to disinfect the filtered water before drinking.
What you’ll need
- 1–2 liter plastic bottle (with the bottom cut off)
- Coffee filter or tightly woven cloth
- Fine sand and coarse sand
- Clean gravel
- Crushed wood charcoal or activated carbon
- Rubber band or cord
- Knife or scissors
Assembly steps
- Prepare the bottle:
- Cut off the bottom third of the bottle; this becomes your funnel opening.
- Poke a small hole in the cap or leave a narrow opening by slightly loosening the cap to control flow. Alternatively, leave cap on and drill a few tiny holes for a controlled drip.
- Install the prefilter:
- Place a coffee filter or folded cloth over the bottle mouth (inside the cap area), and secure with the cap or a rubber band on the outside. This prevents media from escaping and provides an initial sediment barrier.
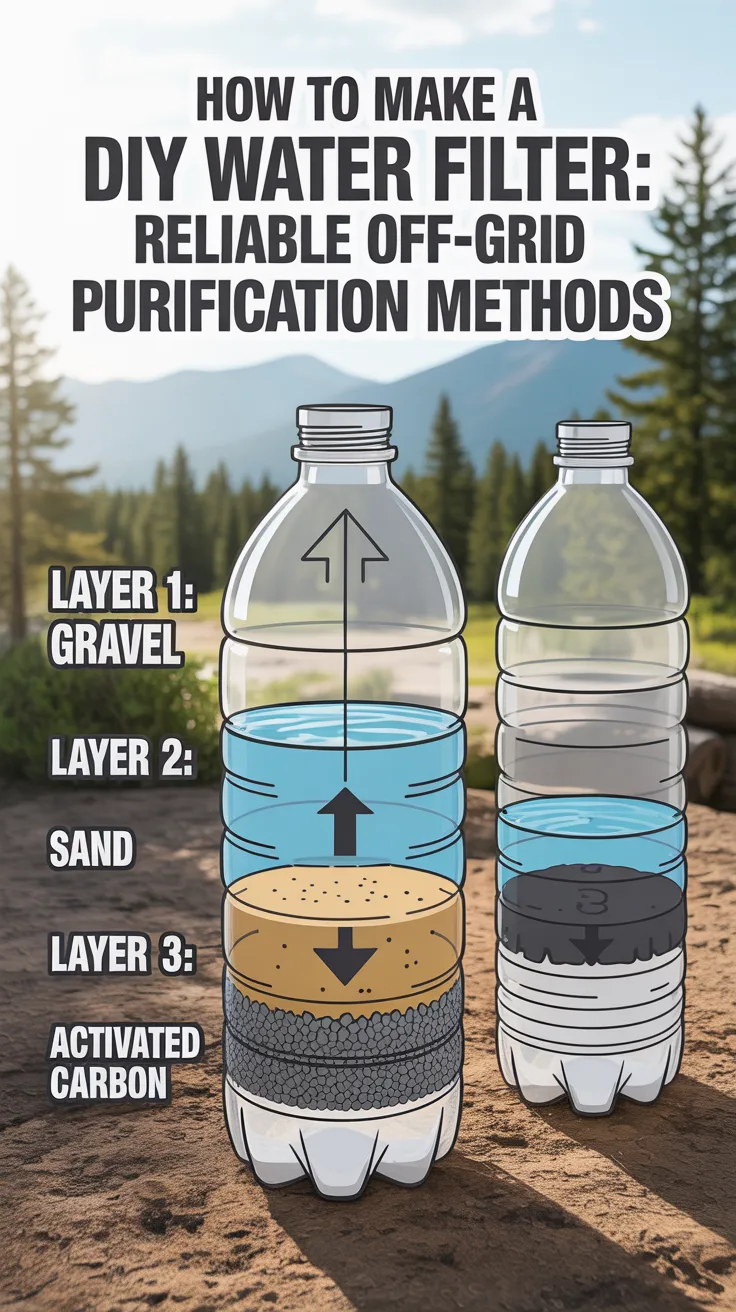
- Layer the media (from bottom/outlet to top/inlet):
- Bottom (near cap): Thin layer of fine sand (2–3 cm).
- Above that: Layer of crushed charcoal/activated carbon (3–5 cm).
- Above that: Layer of fine sand (4–6 cm).
- Above that: Layer of coarse sand (3–5 cm).
- Topmost: Layer of gravel (3–5 cm) to spread the flow and catch larger debris.
Note: The exact heights aren’t critical; aim for gradual transition from finest media at the outlet to coarser media at the inlet.
- Prefilter your raw water:
- If water is very turbid, pour it first through a folded cloth or coffee filter into a separate container. This prolongs the life of your bottle filter.
- Filter slowly:
- Pour raw water into the open bottom (now the top). Let it drip through slowly. Discard the first one or two runs if the water appears cloudy from new media.
- Collect filtered water in a clean container with a lid.
- Disinfect:
- Always follow with boiling, chemical, or UV treatment (details later) before drinking.
Maintenance and tips
- Flow too fast? Add more fine sand or tighten the cap’s holes for a slower drip.
- Taste issues? Increase charcoal/activated carbon layer depth.
- Replace media periodically: If taste or clarity worsen, rebuild or rinse the sand and gravel thoroughly; replace charcoal with fresh material.
- Avoid cross-contamination: Don’t dip dirty containers into filtered water. Use a clean ladle or pour only.
- Storage: Keep the filter covered when not in use to prevent dust and insects.
This bottle filter is ideal for day hikes and emergency kits. At home or in camp, a gravity bucket filter is more convenient and scalable.
How to make a DIY water filter at home with gravity buckets
A bucket-based gravity filter provides larger volume without pumping. This design relies on slow flow through layered media, improving clarity and taste prior to disinfection.
What you’ll need
- Two food-grade 5-gallon buckets with lids
- Food-grade spigot
- Drill and bits (including hole saw sized to spigot and small pilot bits for drainage)
- Clean gravel, coarse and fine sand
- Crushed charcoal or activated carbon
- Cloth or coffee filters
- Mesh screen (optional)
- Bleach solution for sanitizing
Build steps
- Prepare the clean-water bucket:
- Drill a hole a few inches from the bottom for the spigot. Install and tighten per instructions. Sanitize inside surfaces and spigot with dilute bleach solution, rinse, and air-dry.
- Label this bucket “Filtered/Drinking Only.”
- Prepare the filter bucket:
- Drill several small holes in the center of its bottom or leave intact if you will route water through the spigot bucket’s lid. A common approach is to sit the filter bucket on top of the clean bucket’s lid, aligned so water drips through a hole in the lid into the clean bucket below.
- If using a stacked design, cut a hole in the top bucket’s bottom and a matching hole in the lower bucket’s lid to let water pass. The goal is to keep filtered water sealed in the bottom bucket.
- Layer the media in the top (filter) bucket:
- Bottom layer (closest to outlet): Fine sand, 5–8 cm.
- Above that: Charcoal/activated carbon, 5–8 cm.
- Above that: Fine sand, 8–10 cm.
- Above that: Coarse sand, 5–8 cm.
- Top: Clean gravel, 5–8 cm.
- Optional: Place a cloth or mesh between layers to keep media from mixing. Finish with a removable cloth or coffee filters on top for easy prefiltration.
- Assemble and test:
- Nest the filter bucket onto the clean bucket, align holes, and secure lids to reduce contamination.
- Pour a small amount of water to settle the media. Discard the first 2–3 gallons as the sands/charcoal flush. Water should run clearer with each batch.
- Operate:
- Add raw water to the top bucket. Keep a lid on to reduce dust and insects. Let gravity do the work.
- Use the spigot on the lower bucket to dispense filtered water into clean containers.
- Disinfect:
- After dispensing, disinfect the filtered water before drinking. Boiling or chemical treatment is recommended.
Maintenance and safety
- Regularly replace the top prefilter cloth/coffee filters.
- If flow slows dramatically, gently stir the top few centimeters of sand or replace/clean layers. Never reach into the clean lower bucket with dirty hands.
- Sanitize spigot and lower bucket periodically with a mild bleach solution.
- Keep the setup off the ground and away from sunlight to reduce algae growth.
If you want a modular, no-plumbing option with components designed for potable water, consider pairing your setup with SmartWaterBox as a flexible upgrade for storage and portability.
Disinfecting water after DIY filtration
Filtration improves clarity and taste, but disinfection is the step that addresses microbes. Choose one method (or combine) based on your context. Always start with the clearest water possible for best results.
Boiling
- Bring water to a rolling boil for at least 1 minute (3 minutes above 2,000 meters/6,500 feet).
- Let it cool naturally and store in clean, covered containers.
- Pros: Highly effective against bacteria, viruses, and protozoa. Requires no chemicals.
- Cons: Requires fuel and time; may affect taste.
Chemical disinfection with household bleach
- Use only unscented household bleach with sodium hypochlorite (check label strength).
- Common guideline: Add about 2 drops per liter (8 drops per gallon) of 6–8.25% bleach to clear water. For cloudy water, double the dose. Stir well and let stand for 30 minutes. You should detect a slight chlorine smell; if not, repeat the dose and wait another 15 minutes.
- Pros: Simple, inexpensive, effective when dosed correctly.
- Cons: Taste/odor; effectiveness reduced in very cold or dirty water; check expiry.
Chlorine dioxide tablets
- Follow manufacturer’s instructions for dose and contact time (often 30–240 minutes depending on temperature and turbidity).
- Pros: Good taste, effective on a wide range of pathogens.
- Cons: Cost; time to work; not all tablets are equal.
Solar disinfection (SODIS)
- Fill clear, thin PET bottles (up to 2 liters) with filtered water and place them in full sun for 6+ hours (or 2 days in cloudy weather) on reflective surfaces like corrugated metal or foil.
- Pros: No fuel or chemicals; lightweight.
- Cons: Requires strong sunlight; works best with very clear water; not ideal for large volumes or emergencies.
UV treatment devices
- Portable UV purifiers work well on clear water. Follow device instructions for volume and exposure time.
- Pros: Fast and effective on microbes.
- Cons: Battery-dependent; not effective in turbid water; does not improve taste.
Taste improvement after disinfection
- Let chlorinated water rest uncovered for 30 minutes or aerate by pouring back and forth between clean containers.
- Activated carbon in your filter reduces residual chlorine taste.
No single method covers everything. A practical approach is to filter for clarity, then disinfect by boiling or chemicals, and finally store in clean, sealed containers with a spigot to avoid hand contact.
Testing, taste, and safe storage
Testing
- Turbidity: Visually compare clarity against a text page; you should be able to see print clearly through a container of filtered water.
- Residual chlorine: Inexpensive pool test strips can confirm a small residual after chemical treatment, indicating ongoing protection.
- Odor and taste: Musty or chemical odors suggest source contamination; seek a different source if possible.
Taste optimization
- Use fresh activated carbon in your filter for taste and odor reduction.
- Aerate water by shaking in a sealed bottle or pouring between containers.
- Add a slice of citrus or a pinch of salt/sugar for post-boil rehydration taste (after ensuring safety).
Safe storage
- Choose food-grade containers with tight lids; sanitize before first use.
- Label containers with “Drinking Water,” fill date, and treatment method (boiled, chlorinated).
- Store in a cool, dark location away from chemicals and direct sunlight.
- Use a spigot or pour; avoid dipping cups or hands inside.
- Rotate stored water every 6 months if untreated. Properly treated and sealed water can last longer; inspect periodically for clarity and odor.
Daily planning
- Aim for at least 1 gallon (3.8 L) per person per day for drinking and basic hygiene in emergencies; more in hot climates or for high activity.
- Keep a “dirty” bucket for raw water and a “clean” bucket for filtered/treated water; label clearly to avoid cross-contamination.
- Assign a dedicated, clean ladle and keep it covered.
Container hygiene
- Periodically sanitize spigots and container interiors (bleach solution, contact time 2–5 minutes) and rinse with treated water.
- Replace gaskets if they show wear or mold.
By monitoring clarity, taste, and residual disinfectant, you’ll maintain safer water day-to-day and catch problems before they become health risks.
Sustainable water sourcing and preparedness upgrades
Reliable water depends on both finding good sources and having backup systems that reduce risk and workload.
Sourcing strategies
- Rainwater collection: Set up clean roof catchment with gutters, a simple screen to block leaves, and a first-flush diverter to discard the initial dirty runoff after dry spells. Always filter and disinfect rainwater before drinking.
- Surface water selection: Choose moving water over stagnant ponds when possible; avoid water downstream of livestock areas, industrial sites, or algal blooms. Collect from just below the surface, away from obvious debris.
- Groundwater: Springs and protected shallow wells can be excellent sources if properly constructed and protected from surface contamination. If you’re learning to locate and manage natural sources, see Joseph’s Well for practical strategies to find and secure water off-grid.
Slow-sand concept for long-term filtering
- A deeper “slow sand” bed can develop a biological layer that improves microbe reduction over time. However, it requires careful setup, consistent slow flow, and proper maintenance to be effective and safe. For most households, keep it simple: bucket gravity filter for clarity plus robust disinfection.
Redundancy plan
- Primary: Gravity bucket filter for daily clarity improvement.
- Secondary: Boiling or chemical treatment for disinfection.
- Tertiary: UV or solar disinfection as backup for clear water.
- Storage: Sealed containers with spigots to avoid recontamination.
- Spare parts: Extra sand, charcoal/activated carbon, cloth filters, bleach, gaskets, and a backup spigot.
Upgrades and ready options
- Gravity system for households: If you’re ready to complement your DIY with a dependable, purpose-built filter, a system like Aqua Tower offers convenience during outages or boil-water advisories.
- Portable, modular storage: For flexible handling, transport, and staging of safe water, SmartWaterBox can streamline your setup, especially when you need to move or share water safely.
Routine checks
- Monthly: Inspect lids, seals, and spigots; refresh prefilters; sanitize containers.
- After storms or unusual events: Reassess source water quality and increase disinfection rigor.
- Seasonally: Rotate stored water, deep-clean buckets, and replace charcoal media.
By combining smart sourcing, layered treatment, and durable storage, you’ll turn a simple DIY filter into a reliable household resilience system.
Preparedness upgrades and ready-made options
While this guide focuses on how to make a DIY water filter, pairing your build with purpose-designed gear saves time and adds reliability when it counts.
- Aqua Tower: A dependable gravity solution to keep safe water flowing during outages or when you need an immediate, low-effort option alongside your DIY setup.
- SmartWaterBox: A modular approach for storing, transporting, and dispensing water without cross-contamination—ideal for households or mobile scenarios.
- Joseph’s Well: Practical guidance for finding and securing water sources off-grid, strengthening your ability to locate clean raw water before filtering and disinfecting.
Use these options to reduce labor, increase volume, and add redundancy. DIY plus the right tools is a strong combination for long-term resilience.
Conclusion
Learning how to make a DIY water filter gives you immediate control over water clarity and taste, and—when paired with proper disinfection—helps you produce biologically safer drinking water in emergencies and everyday disruptions. Start with clean materials, build a simple bottle filter for mobility and a gravity bucket filter for the home, then always disinfect and store safely. Add redundancy with smart sourcing and, when ready, supplement with reliable off-the-shelf gear like Aqua Tower or SmartWaterBox. With a layered approach, you’ll stay prepared and hydrated when it matters most.
FAQ
What is the best way to disinfect water after using a DIY filter?
Boiling for 1 minute (3 minutes at high altitude) is a dependable method. Chemical disinfection with unscented bleach or chlorine dioxide tablets also works when dosed correctly on clear water.Can a DIY water filter remove viruses and chemicals?
Most DIY filters cannot reliably remove viruses or dissolved chemicals. Treat DIY filtration as a clarity and taste step, then disinfect. For chemical hazards, seek a different source or certified equipment.How often should I replace the charcoal and sand in my DIY filter?
Replace charcoal every few weeks of regular use or whenever taste/odor returns. Rinse or replace sand when flow slows or clarity declines. Always sanitize containers during media changes.Is it safe to use beach sand or river gravel?
Only if thoroughly rinsed and free from contamination. Avoid media from areas with industrial runoff or obvious pollution. When in doubt, purchase clean sand and gravel intended for aquariums or pools and rinse well.How to make a DIY water filter with materials I already have?
Use a bottle or container, layered cloth/coffee filters, crushed clean wood charcoal, and washed sand/gravel. Pour water slowly through, then disinfect. Even a cloth prefilter plus boiling is a strong start.